
How awesome is this:
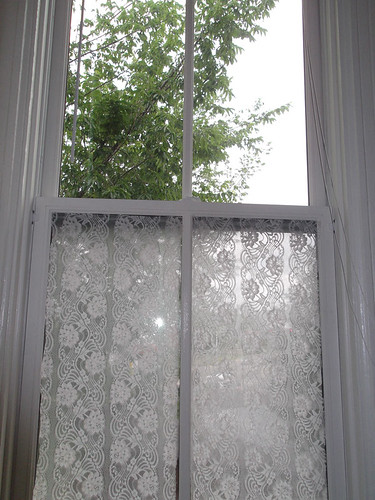
I have an enormous gorgeous window in the bathroom of my new apartment. There is a beautiful tree right outside the window, but in addition to the tree, there's a view of the street. Since I don't like people peeping in on me while I'm in the bathroom, I need something covering the window. But I hated to block out the view of the tree in the top half of the window. The apartment came with blinds, which would be a-okay except that my cat, Smudge, has a strange penchant for crawling through the blinds to peer at birds out the window. I've been meaning to do something about this for the two weeks we've been living here, but when I walked into the bathroom to see the blinds looking crazy askew, I knew today was the day. I really don't want to have to replace the blinds before we move out because I was lazy, ya know?
Originally, I figured I'd make a curtain, but then realized the cat would promptly destroy it. So I thought about contact paper or window film. Contact paper isn't exactly designed for windows, but I know it would work... but did I want to deal with cleaning up the adhesive later when I had to remove it? Nah. Window film is specifically designed for windows, but the size of the glass panels in the window are just a little too big for me to get away with using one roll of film. Did I want to spend $40 on window film? Nah.
Then I remembered having once read a blog about using spray starch to add fabric to walls in apartments when you couldn't paint. I figured that if it worked on a wall; it would probably work on a window so I did a little searching and found this entry from all buttoned up. She used cotton fabric soaked in spray starch to cover her window. What really sold me on the idea was that she'd edited the blog a year and a half later to report that the window treatment was still holding firm.
So, then, I thought "Where the heck does one buy spray starch?" since the last thing I ironed was paper that I'd glued together with gel medium. Just as I was about to head to the store, I thought, "Wait a minute? What's in spray starch anyway?" Turns out it's wicked easy to make your own spray starch. You need, literally, corn starch and water. How awesome would it be if I could make a successful window treatment without even leaving my house or spending a penny? Uh, totally awesome!
I remembered that I'd gotten a bunch of polyester lace for free back when I bought my massive stash of zippers, so I went into the kitchen, where I am temporarily-forever storing my sewing supplies on top of the kitchen cabinets. Luckily, the first box I grabbed was the one with the lace. But I had a problem: I had pink, purple, red, blue, and black lace... but none of those was going to work for my bathroom. I kept digging and then I found it: a large piece of kinda ugly white lace. Perfect!
The first recipe I tried, one for DIY Spray Starch, was an epic FAIL when it came to the windows. {It might work wonderfully for ironing, which is why I still included the link!} Yes, it looked gorgeous; yes, I was able to snap the above photo, but five minutes later, the whole thing fell to a soggy mess on the floor. I reapplied it only to have the same thing happen immediately after. By this time, I was frustrated and also thoroughly committed to making the idea work. I sent Nick to the drug store for a can of spray starch.
While he was gone, I started searching again and came across a post from How About Orange included a recipe very similar to the one I'd used except that it was cooked and thickened. That made so much sense to me! I needed the heat to activate the starch, which is probably why the first recipe would be great for ironing; not so great for plastering shit to your windows. I made a colorless, flavorful gravy using this recipe, very slightly adapted from the original. It worked! It's gorgeous! It's still up after being up overnight. My boyfriend is so impressed with my crafty ingenuity right now. We'll be returning the can of spray starch to the store.
If you'd like to make your own (almost) free window treatments, you will need:
a ruler
scissors
enough fabric to cover your window glass*
large-ish paintbrush, optional, but nice
corn starch
water
large saucepan
rubbing alcohol or spray glass cleaner
* I suspect that natural fibers like cotton would be best because it will soak up the liquid... but so far so good on the cheapo polyester lace! If you aren't sure, just try it. You can also wash out the starch if it doesn't work and use the fabric for something else. The starch will make your fabric less transparent, so if you want to let in light, get the thinnest, most translucent fabric you can find.
Clean the windows. I used rubbing alcohol all across the glass, but this probably isn't strictly necessary. Just make sure they aren't gross, a'ight?
Place two cups of water to boil. In a separate saucepan, whisk 1/4 cup of cornstarch with 1/2 cup of cold water. Whisk in the boiling water and bring to a gentle boil until the mixture just starts to thicken. Remove from heat.
Meanwhile, measure the glass in your windows and cut your fabric to fit. You'll see in the picture that mine ended up just a touch too big. I'm going to trim that later, once it's completely dry, and hope everything stays put. It's easier to make the fabric smaller later than to try to add more to it. Err on the side of big.
Add fabric to the saucepan, making sure to coat, and allow to soak / cool until workable. I waited about 15 minutes, but I was really impatient and it was still pretty hot when I started. You might want to do one fabric piece at a time. The recipe I did was enough for two 14 x 36 inch panels, with a little starch to spare. If you have more fabric than this, you could always add up to 2 cups extra water when you are initially cooking the starch mixture.
Place a towel on the window ledge to catch drips.
Pull out the panel, let it drip a bit, but don't wring it out. Apply to the window by starting at the top, smoothing it into place, and working your way to the bottom. Use the paintbrush to paint a layer of starch on top of the fabric panels.
Allow to dry. Leave the towel in place for a long time, because it will continue to drip. I wiped away the starch drips a couple times during the day with some tissues. This cleans up very easily, so don't panic. I was able to clean the windows very easily from the first recipe I tried and don't anticipate any issues with this one either.
Revel in your crafty bad self. Enjoy your new window look!
This is a fantastic project for guys who have a lot of scrap materials that can be used again. I remember the time when my buddy got his windows and sidings replaced. Seeing that the window fully exposed him to the sun, his wife made him a crafty curtain as a temporary fix while she bought a new curtain fitting for the new windows.
ReplyDelete-Anthony Blommel
Thank you for share I love it
ReplyDeleteJust finished the window in my bathroom. This was a great idea. Thanks so much for sharing!!!
ReplyDeleteSo glad everyone likes it! Mine has held up very well and I love it!
ReplyDeleteThis one is fabulously looking just extreme information about window treatment. The regarding features about this window tutorial are really looking exceptional. I am really impressed to see this one. Thanks for sharing some knowledgeable information in this post.
ReplyDeletecurtains window
The diy decorating window treatment for free is given in the post here. Know all about it
ReplyDeleteCurtains
The diy decorating free window treatment is shared on the post here. Know all about it
ReplyDeleteBean Bags
What a brilliant idea! This is definitely the best alternative for blinds and curtains. It does provide you with more privacy without covering the whole window. You can still see the beautiful view of the tree outside with this. Love it! +Rene Veeravalli
ReplyDeleteOf course, I didn’t expect this tutorial to be totally ‘free’. The end result looks awesome. But I think for my version, I would have the treatment on the upper portion of the window, and put up light drapes on the corner. Roxie @ WindowTreatmentsPhiladelphia.com
ReplyDeleteFabulously looking just extreme information about window treatment. The regarding features about this window tutorial are really looking exceptional. I am really impressed to see this one. Summerdale Mills
ReplyDeleteI am just pretty happy to sign up ones own guestbook these days,Your own feedback and listed below are excellent in my opinion,incidentally I should say also definitely will teach some great supplements for your needs every. 3m thinsulate window tinting climate control
ReplyDeleteThis is lovely, I never thought of that. Well done!
ReplyDeleteThis is lovely, I never thought of that. Well done!
ReplyDeleteThis is lovely, I never thought of that. Well done!
ReplyDeleteReasons to select Plainfield best window contractor
ReplyDeletehttp://plainfieldpromarwindowreplacement.com/
Great article. shutters houston
ReplyDelete