
30 July 2011
Art Journal: DIY Spray Paints
Here's another video! This one shows ways to make your own spray paint. Enjoy!
29 July 2011
Art Journal: DIY "Washi" Tape
Admittedly, this tape doesn't have the wonderful translucent quality that makes washi tape so awesome, but it's a great way to get the cool look of the tape without the big bucks! This video was made for Mission Nine of the 30 Day Craft Cleanse. If you aren't already a member of this FREE art journal class, you should check it out!
25 July 2011
24 July 2011
Art Journal: Copic Couple
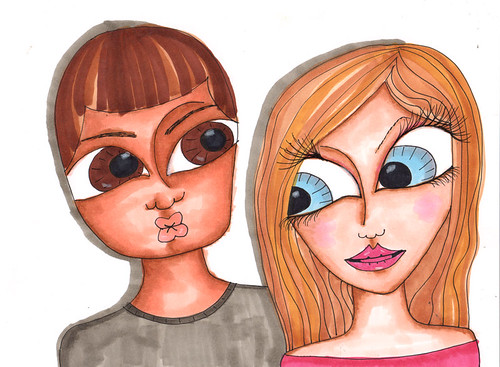
I figured I'd post this to prove that I'm going to give the Copic Marker set I splurged on a good run for the money! I don't like the dude's hair, but am happy that my dude actually looks like a dude! I usually draw girls, so I'm stretching my artistic muscles by drawing this couple. I love the skin tone shading, too!
Buy Nothing Summer: I Cheated!

Okay, so I had no idea if I could stick it out when I started the Buy Nothing Summer on June 18th! The idea of buying no new art supplies for the whole summer was intense... but totally necessary if I was ever going to get my sprawling stash under control. Even though I've made a lot of progress in the past 5 weeks, my apartment is still a mess. I'm telling myself that I'm taking it slowly, but surely, but perhaps I'm moving just a touch too slow.
I have managed to make art every single day since I started the BNS, which is more important, really, and have successfully finished at least one art journal page every single day since at least June 28th. (Can't say for sure before that, because I just started dating my pages!). I've even managed to completely avoid buying any craft supplies for myself and have even been successful in adding stuff from my personal stash into my school bags for the art classes I've been teaching all summer. I've dropped off a few boxes every week or so to local thrift stores, too.
I have avoid shopping almost completely. No retail stores since late June when I bought a couple things I needed for classes. I've completely avoided flea markets, thrift stores, and yard sales, too. I have, however, looked at Etsy a couple of times, even placed a ridiculously low bid on some Copic markers on eBay (I was outbid within minutes); but I haven't actually laid out any cash... until now.
That's right: I cheated. I cheated hard with an $80 purchase. I should feel really bad about this purchase, but the honest truth is that I am elated! I don't regret it one bit!
Don't ask me why I was looking under the "arts and crafts" section of Craigslist yesterday afternoon. That should have been a strictly off-limits zone, but looking I was and what did I see but a listing that said "My art supplies! Cheap!" How could I resist clicking over?
Oh man!
This person was selling a set of 72 Copic markers for $80! I emailed her immediately, BNS be damned! I figured that with a price that good, they'd have been gone already. Or, that it was one of those scams designed to harvest my email address for nefarious purposes. No way could I score a decent set of Copics for that insanely low price tag.
Seriously, folks, I'm not trying to make excuses here, but wow! The cheapest price I'd managed to find before was $3.50 per marker for new Copic Ciao markers or used Sketch markers. I prefer the Sketch, but am happy with any. Since Copics are refillable, buying a used marker is usually a pretty good deal, even if it doesn't have much ink. I haven't been using Copics (or the starving artist favorite, ShinHan Touch Twin markers*) long enough to have to refill them, but I know that buying a refill ink costs about as much as buying a new Sketch marker, but will refill a marker about 5 - 7 times, maybe more. Before the BNS started, I'd been trying to buy a good selection of Copics on ebay for a good six months, getting outbid every single time as the auctions skyrocketed to prices way higher than I could afford.
[* If you can't afford Copics, I think it's great to start out with the ShinHan Touch Twin markers. They are $1.89 each from Jerry's Artarama. The nibs aren't as good as the Copic Sketch markers, but if you are just starting out, I doubt you'll even notice. The nibs also don't last as long as the Copics, either, and they aren't refillable. Still, they work nearly as well for shading at a fraction of the cost. My plan was to start with the ShinHan markers, see if I even liked using them, then add Copics to my stash as I could afford them. I have discovered that I love using the markers, and have slowly added new Copics to my stash by looking for used lots of them on Ebay. I use both markers together all the time with no problems, and the Copic blending pen works well with ShinHan markers.]
Now, I'm all set with Copics for a nice long time. Here's what I got:

These markers have been used... a lot! Some of them have sticky ink on them, probably from being overfilled or not stored well. Some of them have writing on the sides, or paint, or fingerprints. The case has been broken and taped back together with green duct tape and a hunk of foam core. I am seriously in love!
Note that I already made a materials page for the markers. I did it as soon as I got home with them. All of the markers work just fine, though Warm Grey #9 is pretty low on ink. One of the blacks has a broad nib that is a little bit busted up, but the rest are all fine. I expected to have to replace at least a handful, but really, it's not necessary. I did discover that with the new ones, I now have 7 duplicates, which includes two blenders (I already had two E00's), but even with the duplicates, this was such a great score! $1.10 each marker! Amazing! There was no way I could resist this deal. No way!
So why am I even telling you that I bought these markers? Couldn't I have just pretended I was sticking to the plan, man, and not even mentioned the slide? Sure, I guess, but I'm human. I'm not going to pretend that I'm perfect, and, really, I don't think that these $80 purchase has completely derailed my whole BNS summer challenge. I did go 35 days without buying a single art supply, after all, so it's not a total fail. Also, I have decided my "punishment" for this purchase is an extra week added to the BNS challenge. I'm now not allowed to buy anything until September 7th. (No biggie... this markers will be keeping me busy! Haha!)
{The other option was to not allow myself to use the markers until the BNS was over, but I decided that was tantamount to presenting a really hungry chocoholic with the most delicious cake ever and making them swear not to eat it. Ain't happening. There was no way I could resist them that long!}
Also, for anyone else struggling with the BNS challenge or with the 30 Day Craft Cleanse, you should know that no one is perfect, not even me. (Hard to believe, ain't it? Har dee har har!) If you do cave and buy something, admit it, then don't do it again.
It'd be really easy to go on a shopping binge right now, (Perhaps a run to Borders for 40% off everything?) but I'm not going to do it. I chose to splurge on something that I felt was just way too good to pass up, but I'm not going to use one purchase as an excuse to make twenty more and write it off as one bad day.
The lesson, perhaps, is that avoiding temptation really is important. If I hadn't been browsing a "forbidden" zone on Craigslist yesterday, I would have never known about this awesome deal and would never have known that I missed out on it. If you don't go browsing your favorite craft haunts clearance aisle, the same thing applies.
So... take what you will from this! I'm going to take my markers and go play!
23 July 2011
Art Journal: A Week Without
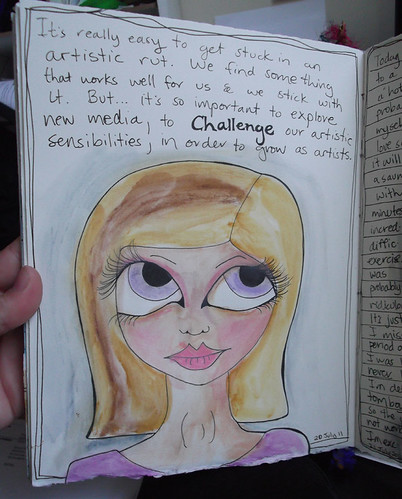
For this week, I'm challenging myself and everyone in the 30 Day Craft Cleanse course to go without our top five favorite supplies. It's pretty brutal, I know, but I'm hoping being forced to try new things will increase everyone's creativity quotient: It's definitely been working for me! Here are my first three pages:
19 July 2011
Art Journal: Must Have Supplies
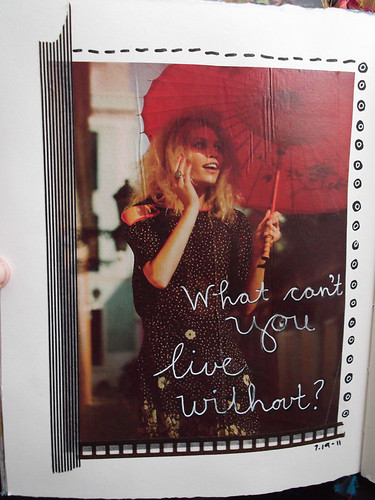
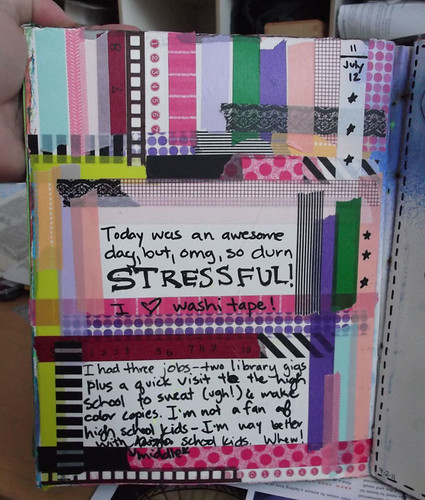
Mission Six for the 30 Day Craft Cleanse is to make a list of your Top 5 Can't Live Without art supplies. Mine are: Sharpie Poster-Paint markers, gel medium, washi tape, magazine images, and uniball signo gel pens. For this page, I used only my top five.
What are yours?
18 July 2011
Art Journal: Two New Pages
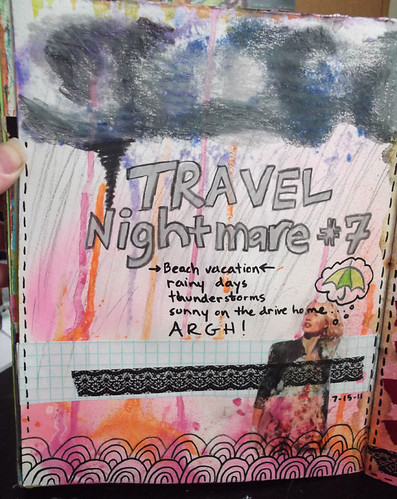
For this page I decided to do the opposite of what I'd usually do, at least sorta. I generally start with pre-painted pages, but so far in my newest journal, I'm starting with white and going from there. I'm not intimidated by the white page!
Lately I've found that I end up not liking the backgrounds and that makes me not want to work on a page. While I do think it's good to test my mettle, if you well, for now, I'm going page by page to see what happens.
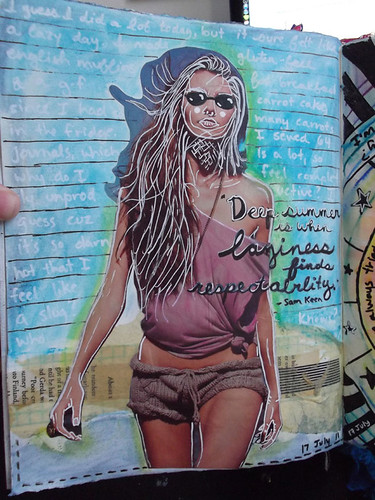
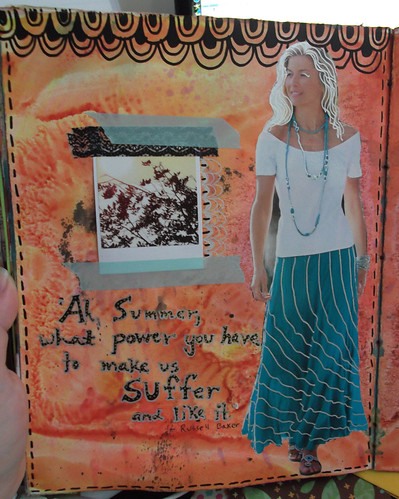
For this page, I glued the image of the girl from a catalog (free people, I think) on some layered graph paper, tissue paper, and an old book page. I added blue on the background with Portfolio oil pastels in three shades of blue.
I found the quote "Deep summer is when laziness finds respectability. - sam keen" and thought it was perfect for the day I was having. I was sort of being productive, but mostly soaking up the AC and staying out of the heat.
I used a white Sharpie poster-paint marker to journal on the background. I started off with the uni-ball signo but for once, it didn't want to write! Usually, that sucker writes over everything, so now I know it doesn't like the watersoluble oil pastels!
I used a sakura gel pen to add the black lines between the text. That actually didn't work so well either, but I found that by doubling back and tracing the first line, I could get a good line. Plus, I like the kind of faded look of it.
Usually, I'd outline the girl in black, so today I decided to try white. It's kind of neat looking, but also weird. I messed up her eyes, so I drew in the sunglasses. She looks like a member of ZZ Top now, since the shading on her neck looks like a beard. Oh well. At least I tried something new!
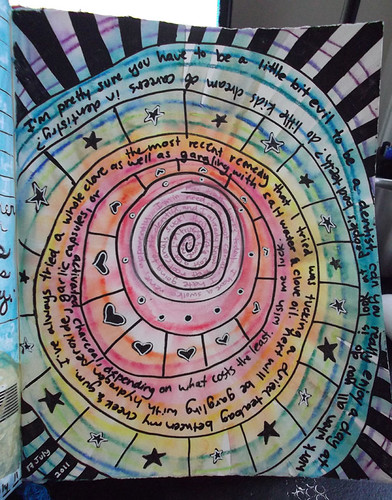
I have been suffering from a toothache, so last night I decided to Journal It Out. I started with a circle in the middle, where I wrote about hating going to the dentist, then drew rings of neocolor II's around the circle in rainbow order. I used a wet finger to drag the color from the middle out to blend a little.
When it was dry, I went back in with my trust Sharpie poster-paint marker and added black circle outlines, more text, and doodles. Finished by using a white uni-ball signo gel pen to add accents.
I think it's funny that this page ended up all bright and cheery even though I'm writing about dentists being a little bit evil. Working on this page definitely took my mind off the pain for a while and gave my ibuprofen a chance to kick it. Will have to remember the power of journaling if I have issues again. (I'm sure I will since it takes about a million years for me to get in to see my dentist!)
17 July 2011
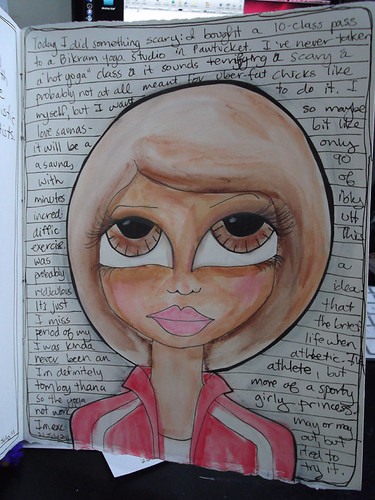
Art Journal: Artist Insecurities
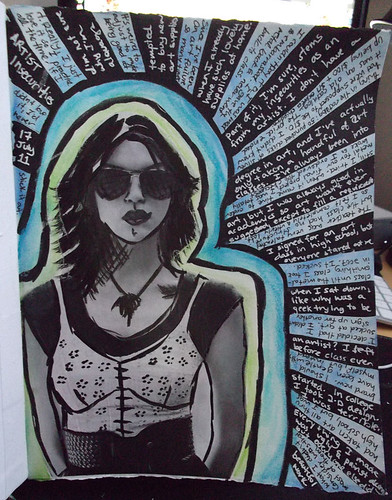
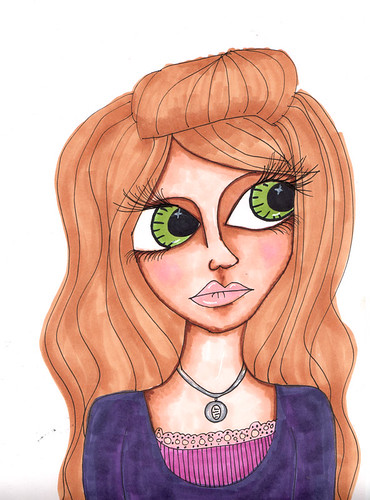
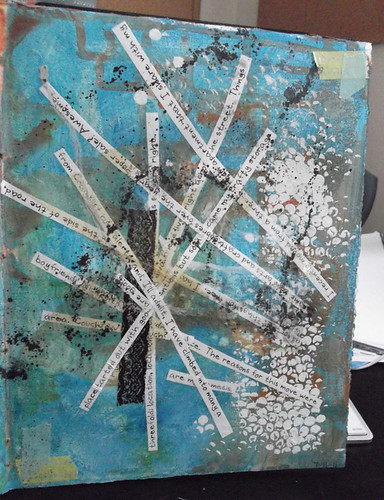
For this page, I started with black&white catalog image. I used Portfolio watersoluble oil pastels to create the green & blue background (inspired by peacock feathers!). Then I used black sumi ink to add the black stripes and details on the girl. I let the ink dry overnight (it can take a while) then journaled with white & black gel pens. I am THRILLED with this page. I wrote about my insecurities as an artist.
Text reads:
I’m not sure why I’m always tempted to buy new art supplies, when I already have such lovely supplies at home. Part of it, I’m sure, stems from my insecurities as an artist. I don’t have a degree in art, and I’ve actually only taken a handful of art classes. I’ve always been into art, but I was always good in academics so art wasn’t even suggested, except to fill a requirement.
I signed up for one art class in high school, but everyone stared at me when I sat down, like why was a geek trying to be an artist? I left before class even started.
In college I took 2-D design. I was terrible. Everything I made was ugly and painstaking but everyone else did beautiful work. What I didn’t consider was that most of them had taken art all through high school, but I was brand new. I should have been gentle with myself, but instead I decided that I sucked at art.
I didn’t sign up for another class until the metalsmithing class I took in 2007. It sucked. The teacher was very talented, but the class had no structure so I felt completely and utterly lost. Still I tried. When it came time to order metal for our final project, I was totally broke so I ordered the cheapest thing in the catalog: 50 tiny punched disks of silver that were supposed to be $10.
I didn’t know it was an old catalog. The price ended up being $100 + $17 express shipping. I couldn’t pay it and I was mad / embarrassed. I gave the metal back and never went back to class.
Since I’ve been an art failure so many times, it’s weird to adjust to maybe being good at it. Really, I just love it so I practice all the time. If I didn’t love it, I’d never stick it out.
(Read more at at the 30 Day Craft Cleanse group on Art Journaling -- it's completely free to sign up.)
15 July 2011
Art Journal: New Pages
I've been SO BUSY this past week, but one thing I have managed to make time for every single day is making at least one art journal page. Hurray! I started dating my pages on June 29, and I've made at least one page every single day since then. The streak could be longer, since I wasn't tracking pages before then, but I am pumped about the streak. I'm hoping to keep it up! So far so good...
I like having a daily art practice because it's making sure I do at least one thing for myself every day. When I art journal, it's totally for me. I have no thoughts of selling the work down the line, no particular purpose for the pages, they are just for fun and to develop my artistic vision. I love that!

I like having a daily art practice because it's making sure I do at least one thing for myself every day. When I art journal, it's totally for me. I have no thoughts of selling the work down the line, no particular purpose for the pages, they are just for fun and to develop my artistic vision. I love that!
11 July 2011
30 Day Craft Cleanse: Donations Welcome

The 30 Day Craft Cleanse course is completely free to you, but your donations will be merrily accepted! I'm putting a lot of work into making this class awesome (I hope!), and I'd love to hear your feedback on it, too. Since your donations will make future classes like this possible, I want to reward my potential patrons will a little crafty love. Since you won't be buying any new materials for 30 days, perhaps you will appreciate the small infusion of a little crafty wonder into your life?
Donate $5, get a crafty scrap pack (could include vintage book pages, washi tape sampler, paper doilies, colored hemp, beads, or whatever else I decide to include)
Donate $10, get a crafty scrap pack + a 3 cute magnets made by me
Donate $15, get the above gifts + any pocket mirror or bottle opener from my etsy shop, Literary Tease.
Donate $20, get the above gifts + an 8 x 10 signed metallic print by me (your choice of Boys Boys Boys, Light My Fire, No Rules, Crazy For You, Love Grows, I Miss You, California Girl, Gypsy, Bathing Beauty or Pretty in Pink)
Plus, for every $10 you donate over $20, you'll get an additional signed 8 x 10 print.
Your print options: |
| I Miss You |
 |
| Crazy For You |
 |
| Love Grows |
 |
| Boys Boys Boys |
 |
| No Rules |
 |
| Light My Fire |
 |
| Pretty In Pink |
 |
| Gypsy |
 |
| Bathing Beauty |
10 July 2011
Art Journal: Free Online Class
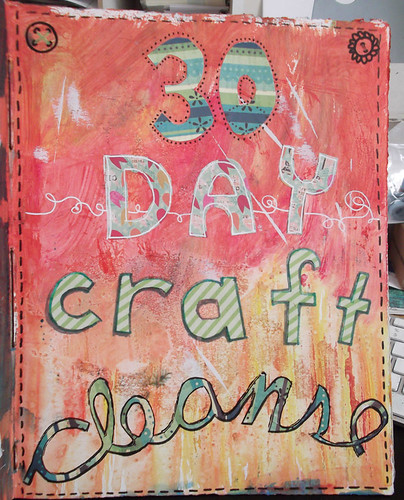
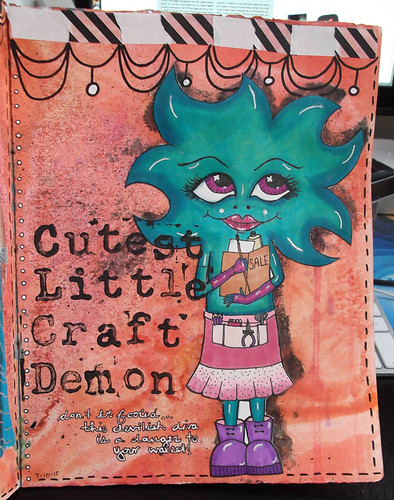
Inspired by my Buy Nothing Summer, I'm doing a free art journaling course that starts on July 15 and runs through August 15, though you can pick up and start at any time. Here's the introduction to the course. Maybe you'd like to stop by the 30 Day Craft Cleanse and check it out?
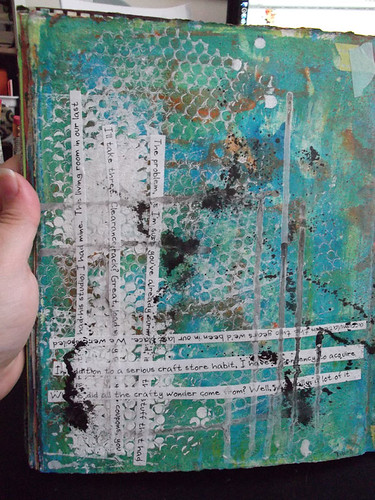
If it's true that it takes 30 days to make or break a habit, we've got the next 4 weeks to kick those greedy craft demons living inside us to the curb. Hello, my name is Moira, and I am a crafty packrat. There, I've admitted it. Yes, if you were to come to my house, you would find it packed to the gills with crafty wonder. And do I mean packed!
I recently moved from a three bedroom apartment that I share with my boyfriend, Nick, into a one-bedroom place. The reasons for this move were threefold: location, location, location. Also, the price was so very right. Plus, my fabulous crafty diva friend lives right across the street. Things are good.
The problem, as I'm sure you've already surmised, is all the stuff that had accumulated in the two years we'd been in our last place. We were spoiled rotten, all right? He had his studio; I had mine. The living room in our last place started out with good intentions but soon became my crafty storage area. Couch? What couch? Doh!
Where did all the crafty wonder come from? Well, naturally, a lot of it came from arts and craft stores over the years. Super sale? Awesome, I'll take three. Clearance rack? Great, load up my cart. 40% coupons, you are my nemesis.
In addition to a serious craft store habit, I have a tendency to acquire all sorts of things for free. I have found objects on the side of the road, from Craigslist curb alerts, and, I'll admit, I have climbed into many a dumpster in my day. [If you aren't already aware of this, you'd be surprised at the sheer volume of stuff being thrown away by your favorite craft stores. One dumpster hot spot in my old neighborhood was Joann's.]
People who know my crafty ways often present me with gifts of craftiness: stacks of magazines, bags of yarn, beads, you name it.
Oh, and I’m an art teacher. (Insert groans of super organized people everywhere.) I am a freelance artist-educator who provides programming for middle school youth and, occasionally, older teens and adults. I teach classes all around the state of Rhode Island, and all of the many, many supplies that I use for my classes live in my house.
Often I feel like conquering my crafty demons is a never ending battle, one I will never win. So for ages, I have succumb to the demons and allowed my crafty wonder to grow and grow and grow. While I’ve never had a problem getting rid of clothes, furniture, or books, I hold on to craft supplies for years, even if I never use them. No longer!
On June 18 I made a vow. A vow to keep my wallet in my pocket and to keep on walking when the craft sales are talking. I called it my Buy Nothing Summer and started a series of blog posts about the adventure. I decided that if I couldn’t bring myself to get rid of all my crafty wonder, I would do my best to use it up. I am determined to bust my crafty stash this summer. I’m three weeks in and going strong.
What does all this have to do with you?
Well, here’s the thing. when I issued the challenge to myself, I invited other people to join me, and I did have a few brave takers, but the response by far has been, “Gee, that’s great & I should do it, but I could never keep that promise.”
And I totally get that!
The past three weeks haven’t been easy. I won’t deny that I haven’t thought on more than a few occasions that I should just stop at Michaels while I was driving by, maybe just look around a little, maybe buy something small, no one would ever have to know... But I have successfully resisted temptation for these last three weeks, and you know what, if I, Moira, queen of the crafty packrats, can do this thing, so can you. For sure. I know it.
So why not try it? You’ll be in good company here. This is a safe place. And if you fail? So what? Pick yourself up, dust yourself off, put away your credit card, and try not to do it again for the rest of the 30 days. Your wallet will thank you.
I challenge you to make a vow to not purchase any new arts and craft supplies for the next 30 days. Feel free to add a couple of rules to the process like I did, but try not to go overboard. Art isn’t about the stuff; it’s about the creative process. Let’s see just how true that is during our 30 Day Craft Cleanse.
07 July 2011
Art Journal: Summer Quote
{Looking for the giveaway? Scroll down one entry!}
All in all, not my favorite page... but it's okay, because not every page can be my favorite page. The fun part was the creation: The fiery background was pre-painted back in may everything else was added "on-location."
If you ever visit Rhode Island, I recommend a trip to the Sakonnet Vineyards in Little Compton (go to South Shore beach afterwards!). Although everyone goes and does the tasting, I recommend something different: pack a picnic lunch, drive to the vineyard, and buy a bottle of their most popular white or red, depending on your preference.
[I heard rumors that you should bring your own corkscrew, but it wasn't busy when we were there, so we didn't need it. If you go on a weekend, you might!]
The coolest thing about Sakonnet Vineyards is that they have tables and chairs and picnic tables scattered around the grounds that you can use to have your picnic. WAY better than a tasting, which is usually crowded and kind of overwhelming.
We did our picnic, then since we had some time to kill until 5 pm (when they stop charging $14 for residents to park at the beach... crazy!), so we worked in our art journals. So this page is the result of a nice summer picnic and a few glasses of wine. Oh yeah... :)
Quote reads: "Ah, Summer, what power you have to make us suffer and like it! - Russell Baker"
06 July 2011
Giveaway: Book Binding Tutorial (PDF)
 |
| Future travel art journal! |
I am working on a PDF tutorial for making the journal above. I developed the technique after not being able to find a tutorial available to make what I wanted to make: a hardback journal with a fluffy spine. I don't really know why I wanted to make such a journal, but I did, so I figured out how to do it. I took a bunch of picture of the one I was making last night, intending to make a tutorial for on the blog. I realized, looking at the picture this morning, that they would be perfect to turn into a PDF for me to sell, both on the blog and in my etsy shop. It's really too long for a blog entry anyway.
 |
| Future art journal... so pretty, right? |
I am doing a really in-depth tutorial. I have 38 high-res photographs and have already identified a couple of places where I need a few more photos to clarify my point. While this makes it sound like the journal is really complicated, it's not, once you get the hang of it. Plus, I have thought of a couple ways to adapt it so that it's like getting a few tutorials in one.
Here's where you come in: I need a tester (or a few) to try out the tutorial once I've gotten it finished. So by entering this giveaway, you are hopefully entering because you'd like to give the tutorial a whirl -and- would be willing to give me feedback on your experiences with it. I teach people how to make things in person all the time, but doing a PDF is a whole different ball game. I need to know what's confusing and what's overstating the obvious. I need to know what questions people might have that should have been answered in the tutorial and I need to know that the way I explain the steps makes sense to people other than me.
In exchange for this service, you'll get a copy of the tutorial free of charge and, hopefully, a beautiful book made by you at the end of it. [I will be available to help you with anything that's confusing, naturally!] Plus, if you are selected and you get back to me with feedback within a timely manner (One week? Maybe two?), I'll send you any pocket mirror, bottle opener, or button you'd like from my shop or make you a custom one with your own image. Not bad, right?
To enter the giveaway, just leave me a comment telling me why you'd like to learn how to make this book. That's it. Being a follower is not required. If you have friends who might be interested, feel free to tell them! If you really, really want to win, tell me that in the comments, because I might choose a few extra people! I will choose a winner this weekend, or when the tutorial is finished, whichever comes later.
05 July 2011
Art Journal: In The Sun Round Up

We're a month in over at Natty Malik's In The Sun art journal course, so I figured I'd share all of the pages I've created for this course to date. I am impressed with myself for keeping up as well as I have! You should definitely check out the In The Sun flickr group to see what all of my classmates have been creating as well. We've got an amazing bunch of artists working together this summer, and I am thrilled to be a part of the fun.
Clicking each image will bring up flickr, where I describe my process and tell you more about the images. I put the images after a break because it's a very image-heavy post.
04 July 2011
Art Journal: Beach Playlist
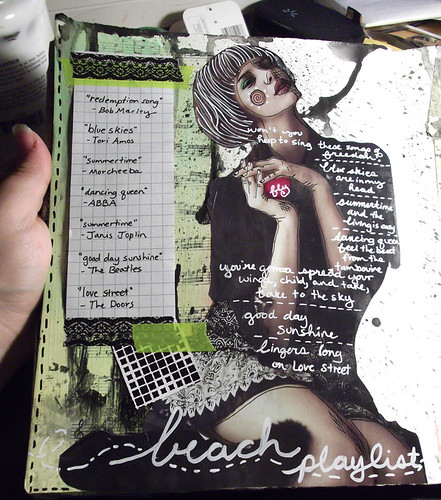
This page was a fun one! I started by gluing half a sheet of old music to the left side of the page. Dry-brushed on some neon green craft paint when it was dry, then used watered-down black craft paint to add lots of drips and splatters.
The image came from a glossy magazine that has long since lost its cover -- no idea which one! (Wish I did! I'd subscribe!) I used a white Sharpie poster paint pen to add text at bottom and a Uni-Ball Signo Gel pen to add white text on the girl. Text is bits and pieces from all of the songs. I used Copics to add color to her face, accented with a black Sharpie pen.
For the list, I tried writing over the background, but none of the colors showed up very well, so I covered it with a graph paper list instead. Luckily, I had the perfect colors in washi tape! (Love the lace one!)
List is:
redemption song - bob marley & the wailers
blue skies - tori amos
summertime - morcheeba
dancing queen - ABBA
summertime - janis joplin
good day sunshine - the beatles
love street - the beatles


Teen Summer Classes: Shrinky Dink Self-Portraits


After asking the students to tell me what a self-portrait is, I explain that a self-portrait is more than just a picture: we want our self-portraits to tell a story about who we are to someone who doesn't know us. So if you like cats, you might want to draw a picture of a cat. Or make your drawing of you be wearing a t-shirt in your favorite color.

I always have at least one student tell me that they can't draw, and I tell them that this project is a good way to practice their drawing skills. I tell them that drawing takes a lot of practice and that even people who can draw well didn't start out that way.

I also always tell the students that their drawing don't have to be perfect, because perfect is boring. I love it when I say this, because there is always at least one student who repeats the phrase to herself, like she is trying the idea on for size. I like to imagine that at least a few of my students here and there take that phrase home later and own it.

After the students have drawn a portrait they like, they trace it on to the shrink plastic (rough side) in pencil, and then trace over the pencil lines in marker.

The last step is to add color using colored pencils. Then they bring the design to me, where I punch a hole and bake it until it shrinks. This process amazes anyone who has never seen shrinky dinks in action!


Subscribe to:
Posts (Atom)