28 January 2011

Recipes: Crockpot Vegan Mulligatawny Indian Soup

The history of mulligatawny is hard to trace back to one definitive source. Legend has it that British soliders in India ordered their servants to prepare soup for them and mulligatawny (meaning "pepper water") was the result. The soldiers brought the recipe back to England, where it took on a life of its on.
No two mulligatawny recipes are ever the same, but generally the soup includes a chicken base, shredded meat, fruit, vegetables, cream, Indian spices, and, of course, curry. In this vegan crockpot recipe, I've kept the flavors as best I could by substituting winter squash and tempeh for the meat and coconut powder for the cream. Note that when you are making this soup, you will want to adjust the spices to your taste level. I don't like my food very hot-spicy, but if you do, you might want to kick up the seasonings a notch.
Like all curries, the flavor of this soup improves with time, so don't be afraid to prepare it several days in advance. Also, don't be afraid to swap out ingredients: replace cranberries with raisins, butternut squash with acorn squash, lime juice with lemon, etc.
Vegan Mulligatawny Soup Recipe
for the Crockpot or Slow Cooker
You'll need the following ingredients:
1 cup roasted & smashed butternut squash*
1 cup roasted and smashed pumpkin*
8 oz 5-grain tempeh, cubed
3/4 c. chopped carrots
1 medium apple, peeled, cored, & diced
1 15 oz can chopped tomatoes
1 1/2 T. crushed/chopped dried tomatos
3 T. diced fresh green onions
1/4 c. dried cranberries
1 t. fresh lime juice
1 T. garam masala
1 t. mild curry powder
1 t. tumeric
3 cups vegetable broth
4 T. coconut powder (from your local Asian market)
1 t. smoked salt
1 t. cumin
1/4 t. ginger powder
dash cayenne pepper
In a large crockpot or slow cooker, put squash(es) and tempeh in bottom of crockpot. Add apple, carrots, canned & dried tomatoes, onions, and cranberries. Add lime juice, spices, coconut powder, and broth. Stir to mix spices into the broth. Cover and cook on low for 6 - 8 hours. The soup is ready to serve as soon as it get hots, but cooking longer will allow flavors to blend. Serve over a scoop of cooked rice.
* I cut my squashes in half, removed the seeds and innards, and roasted cut side down in a 400 degree F oven until they were tender, about an hour and a half. Don't throw away those seeds: both butternut squash and pumpkins seeds can be rinsed and toasted for a delicious snack!

Iron Craft #4 - Get Cozy


Here is my submission for last week's IronCraft challenge. This week the challenge is to make a Valentine's Day card, which is fun, since I've been working on them for the last two days. Great minds...

27 January 2011

Can Wii Fit help you lose weight?


Can Wii Fit help you lose weight? That's what I aim to find out! I've been using mine for 30 minutes day for a week now. Sure, I've gained a pound instead of losing, but whatever. I'm giving it at least a month before I make any judgments!

I've wanted a Nintendo Wii game console and Wii fit for ages now, but haven't really been able to justify the expense. We were lucky enough to get a free Wii console recently, and by combining a couple of gift cards, we ended up paying just $21 for a Wii Fit to go with our console. That, my friends, is a hell of a good deal.

I've been saying for months that if I had a Wii Fit, I'd use it every day. It's very easy to say that when you don't actually own one... haha! Still, we've had our Wii Fit set up for a week now, and I've done 30 minutes (at least) every single day for the last week. And I'm not being a twerp about it either, by playing that stupid lotus game for 30 minutes straight. (Apparently, I am literally unable to sit still!). Even though I recently found out that my Wii Fit is spying on me by asking my boyfriend about my posture, I still love it.

And the thing is, I still don't want to exercise. It's not like that I wake up and think, "Yay! Exercise!" Instead, I have to force myself to get started... but, the coolest thing about the Wii Fit is that once I get started, it's not that hard to keep going. Sometimes I do yoga, sometimes aerobics, and sometimes just a bunch of games. (I'm pretty good at that penguin slide game!) I haven't even tried any of the strength training yet, so I still have a lot to explore.

I set a goal of doing 20 minutes a day, minimum, but almost every day, I've done at least 10 minutes extra. One day, I did 50-some minutes. My favorite activity so far is the biking. I've unlocked the Advanced, Island View, and Expert courses. I haven't tried Expert yet, since I just unlocked it last night, but the Island View course took me 21 minutes and I think I ended with just over 5 miles. I don't know if this counts as "real" exercise, but it definitely gets me sweating!

This morning I woke up at 7:30 am and did 20 minutes of yoga before 8 am. Did I do this because I love yoga and was raring to go? Hell no! I decided to get exercise out of the way early so I didn't have to put it off all day. Haha!

I'm not bored with the Wii Fit yet, but I imagine I'll get bored with it eventually. So I ordered another Wii fitness game called Walk It Out. It should be arriving today or tomorrow, so I'll post about it once I've tried it. It got positive reviews on Amazon though and sounds like something I'll like. Eventually, I'm going to get EA Sports Active. Nick and I are saving our change; we have $16 towards the game so far.

23 January 2011

Happy National Handwriting Day

My new font: Art Journal Dots
Today is National Handwriting Day. In honor of the holiday, YourFonts.com is offering FREE custom fonts when you use the coupon code: CPN2011FUN.  Custom fonts are usually $9.95, so this is a great deal! The best part? You can make more than one font! Hurray! I made one font that was just my regular handwriting. Then, I decided to make a font with capital letters like the letterings I do in my art journal. Fabulous, eh?
Another font: Moira Handwriting
So, if you have always wanted to have a font in your own handwriting, head over to YourFonts.com to get started! Enjoy!


21 January 2011

Recipes: Crockpot Cuban Ropa Vieja Stew

The first time I had Ropa Vieja was at a Cuban restaurant called Cuban Revolution in downtown Providence, Rhode Island. I ordered the Ropa Vieja because it was, well, the cheapest thing on the menu, and I was, like always, broke. Plus, it was a chilly October day and I knew a nice bowl of soup would fill me up and leave me warm. The Ropa Vieja was so delicious, especially for a menu item that included a description with the words "old clothes", and I've never forgotten how yummy it was. A few months later, I ordered the dish again, but it just wasn't as good as the first time! (I guess nothing ever is, eh?)
This weekend, I had a hankering for Ropa Vieja, and I decided that instead of taking a trip to Providence and dealing with trying to find a place to park, I'd make my own version and hope for the best. The stew took 4 hours to cook in my crockpot, so it's not a fast recipe, but it was so delicious that everyone eating dinner last night cleaned their plates. My boyfriend had seconds and might have gone for a third if he'd had room in his stomach and we didn't have to leave for our moonlight maze and hayride. I don't cook with meat very often, but when I do, I want a delicious dish that's worth the expense that meat usually entails. This dish was fantastic and I know I will make it again and again.
Moira's Ropa Vieja, Slow Cooker Recipe
Serves 6 - 8, maybe more
You'll need:
1 T. vegetable oil
2 lbs beef flank steak* see note below
1 cup chopped celery ribs
1 small sweet onion, cut into thick chunks
1 15 oz can diced tomato
1.5 cups beef broth
1 8oz can tomato sauce
1 green bell pepper, seeded & cut into thick chunks
1 red bell pepper, seeded / thick chunks
8 cloves garlic
1 6oz can tomato paste
1 Tb. cumin
1/8 t. cayenne pepper
1 T. olive oil
1/3 cup apple cider vinegar
1 t. smoked salt
Heat the vegetable oil in a large skillet and brown the steak over medium-heat for 4 minutes on each side. You aren't cooking the meat through, just getting a nice brown color on each side.
Layer the celery and onion on the bottom of the crockpot. Add the beef. You might need to cut the meat in half in order to make it fit. Pour in the broth, tomato sauce, and diced tomatoes. Add the bell peppers, whole garlic cloves, tomato paste, cumin, cayenne pepper, smoked salt, olive oil, and vinegar. Stir to blend spices. Cover and cook on high heat for 4 hours. After 4 hours, remove the meat and place on a plate. Allow to cool for five minutes. Using two forks, shred the meat. Placed the shredded meat back into the slow cooker. Serve immediately or reduce heat to low until ready to serve. You might want to taste the dish and add extra salt or seasoning as needed. The seasonings were perfect for us, but if you want a spicier dish, you might need to add extra cumin and cayenne pepper.
We served this with a dish called Venezuelan Rice & Beans (this recipe, minus the scrambled eggs) & twice-fried plantains (basically, cut a green plantain into thick chunks, about 2 inches, fry in vegetable oil for 3 minutes on each side, until golden. Remove from heat, smash flat, and fry again for 1 minute on each side.) Put a scoop or two of the rice on the plate, add a spoonful of beans, drained, on one side, and a scoop of Ropa Vieja on the other side. Serve with a few plantain slices. So, so good! I'll be eating the leftovers for lunch...
* Note: Ropa Vieja is traditionally prepared with flank steak, but since, I wasn't able to find flank steak, even after visiting two grocery stores, I used London Broil. I believe that it's cut from the same part of the cow, but it's a thicker cut. At the Price Rite near me, London Broil was $5 a pound.
This recipe make enough to feed a crowd! We had plenty of leftovers, so I froze a 2-person portion and put the rest in the fridge. Note: the frozen Ropa was just as good as the original!
This is my own original recipe. I adapted it from several different sources and descriptions of Ropa Vieja. Feel free to make this for all of your friends and family, but please do not republish this recipe online or in print without my permission.

19 January 2011

Candy is Certain

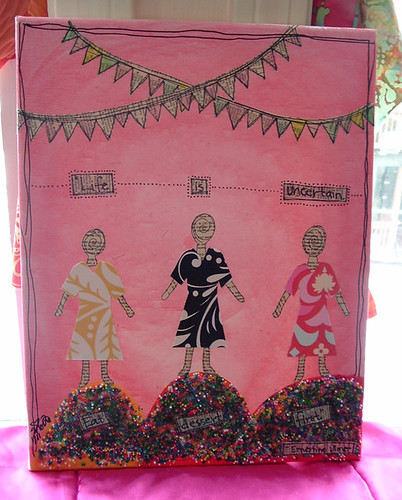
Have you heard of Iron Craft? Each week, a challenge is issued and crafters around the globe step up to answer that challenge. This is week three, and the challenge is Just Bunt. I've been working on mixed media artwork this month (for Fun-A-Day Providence), so I decided to incorporate bunting into my work. I actually made two pieces with bunting, but this is the one I am sending to the Iron Craft flickr group:


candyiscertain
Candy is Certain
copyright 2011
Moira Anne Richardson
I used scrap pages from a vintage dictionary to create the bunting, doll parts, and text using this paper flower technique from Alma Stoller's AMAZING blog. The background is made using a mix of watercolor paint and white gouache, which gives it a creamy cotton-candy look. I used recycled fabric paper scraps to create the dresses and embedded real candy sprinkles into the hills using gel medium and Golden self-leveling gel. The hills look kind of murky because the candy melted a little bit from the gel, but I still like how it looks. I probably won't be embedding any more candy any time soon though, haha!

I finished the piece by using a Sharpie Poster-Paint marker (my favorite!) in black. I'm really proud of how this piece turned out! I've never really done a lot of work on canvas, so it's a new thing for me. The first canvas I did turned out kinda crappy, but I decided that I needed to approach the canvases the same way I approach a journal page and just have fun with it. If I mess up, oh well, I'll just make another one. Also, I decided to keep this simple. I could have added more details, maybe some outlines around the dolls or some more doodles, but I decided to stop and see what I thought about it later. And I love it. So it's staying as is.

I'll post pictures of my other bunting painting and some other work this weekend. Here's hoping the snow holds off, too!

15 January 2011

Etsy Tips & Tricks #7: Be Legit

Becoming a legitimate business is easier than you'd think!
If you are planning on growing your business and really committed to being a business person, you'll need to be legit. Sure, you can probably get away without filing all the proper paperwork, at first, but why not save yourself some potential headaches by starting off the new year as a legitimate business owner? It's free, fast, and surprisingly easy!


How do you become legit?


First things first, you need to apply for a EIN, or Employer Identification Number, from the IRS. Do you really need an EIN? While a lot of people think that you don't need this number if you aren't going to hire any employees, that's inaccurate: the IRS website says that if you are starting a new business, you need an EIN. You'll need this number later to apply for business retail permits, a business bank account, and for wholesale accounts. While this all sounds quite scary, it's actually a really easy process. The hardest part, I suspect, is remembering to to click the link during the available hours, since the IRS EIN application is only available on certain days and times. I just filled out my application and it took all of five minutes. I printed out the pdf file and now Literary Tease is a legitimate business. Woohoo!


Confused about all this stuff? I hear ya! Check out etsy seller, JJMFinance, for ebooks on all the nitty-gritty financial details about being a seller on Etsy.   Jason says, "I am CPA (Certified Public Accountant) and have worked as an international accountant, not-for-profit accountant, and treasury professional (cash & banks). I also have helped countless small business owners with their financial needs." Jason's positive feedback and the recommendation of a friend convinced me to try his product. 


I purchased the Whole Financial Tamale for $50, which I know is going to pay for itself in no time. It's informative and easy to read/understand. I was feeling really scared about taxes for 2010, since it's the first year that my business actually pulled in profits (I think!) and I'm a lot calmer now that I have Jason's eBooks to guide me through the process. This year will still be scary, but I know that next year will be much smoother because I'll be organized and tracking my expenses all through 2011.

14 January 2011

Recipes: Tahini BBQ Kale Chips

If you know me, you probably already know that I am OBSESSED with kale chips.  For months now I've been making several batches of kale chips a week and experimenting with different types of kale and different flavors for the chips. Every week, I pick up a bunch or two of kale at the local farmer's market. I've completely stopped buying potato chips and other snack foods. Kale is where it's at! Yum! My newest favorite flavor is Tahini BBQ kale chips (see the recipe below), but I wanted to share some tips before I get to the recipes.

I knew that you could make kale chips in a food dehydrator, but I haven't really experimented much with that because fifteen minutes in the oven is way faster than overnight in the food dehydrator. Plus, any time I've had leftover kale chips, which ain't often, they've turned soggy and wilted overnight. I've tried storing them in a sealed container and uncovered on the countertop, and it didn't matter, they were gross the next day. Until now...

You wanna know the trick to storing kale chips? Keep them cold! I keep them in a snap-top plastic container in the refrigerator. Perfection. I don't know if they keep longer than a day, because none of mine have made it that long, but I can tell you that they are just as crunchy and delicious the next day when refrigerated overnight. Hurray!

Next tip? I have discovered that kale chips made in the food dehydrator taste way better than those done in the oven! Big surprise! I still recommend the oven method if you want a quick snack, but if you are planning ahead, the dehydrator is the way to go. My dehydrator is a Snackmaster Express, which has a temperature dial on the top. I dry the kale chips spread out in a single layer (usually 3 or 4 trays) for 1 hours at 135 degrees F, then 2 - 3 hours at 115 degrees F. The kale chips don't seem to shrink as much and don't turn brown. They are crazy good.

Here are two kale chips recipes for you to try. Please note that all measurements are approximations, since I never measure, just eyeball it. You should start with 1/2 bunch (approximately 3 large leaves of curly kale) with the center stems removed. Rip the leaves into 2 inch pieces. (Note: any type of kale works for kale chips. I like the curly because it holds the flavor best, but in terms of taste, they all taste the same to me.)

In a large bowl, add the ingredients (below) and mix to coat with your hands. You could use a spoon, I guess, but it's best if you get in there and mix it with your hands. You'll be able to feel when all the leaves are coated. I usually use one hand to mix and hold the bowl steady with the other. This way, too, I have a clean hand to turn on the faucet when I'm finished. Once you've added your ingredients, either follow the food dehydrator instructions above or spread out in a single layer on two baking pans (sprayed with cooking spray if not non-stick) and bake at 400 degrees for 10 - 15 minutes. Remove from the oven when the kale starts to brown. Burnt kale chips = not nearly as yummy as unburnt ones.

Traditional Kale Chips
1 T. olive oil
1 T. apple cider vinegar
1 t. sea salt
1/8 cup nutritional yeast (no nooch? try parmesan cheese... yum!)

Tahini BBQ Kale Chips
1/4 c tahini
1/4 c. BBQ sauce (I used a smoky Kansas-style)
1 T. apple cider vinegar
1 t. smoked salt
1 t. sesame oil

I don't pre-mix the ingredients. I just throw the ripped kale pieces in a big bowl and put the ingredients on top. They get mixed will I moosh everything around with my hand. So, so good.

Enjoy!

12 January 2011

Gluten Free Diet: Day 8

Well, I've been gluten-free for a whole week, and I have to say, it's not as troublesome as I expected. I think it helps that gluten-free diets seem to have gone really mainstream lately. My local Stop&Shop has a whole gluten-free section, with prices that are cheaper than Whole Foods. I actually found that surprising, since usually everything at Stop & Shop is more expensive that other places. I made a loaf of gluten-free bread that was delicious (as well as a batch of English muffins that were decidedly not so much). I made some amazing flourless peanut butter cookies for Nick (and me, let's be honest) as well as a delicious batch of gluten-free snack mix. I learned to look for hidden gluten in foods and condiments, and while I'm still working on making sure I'm getting things right, I think I'm doing alright.

And I feel good! I've had some mild stomach disturbances, but that could be because I'm healing. Or this all could be in my head... but regardless, I'm sticking with it. The true test, I think, will come when I eat something with gluten on purpose to see if it makes me sick. I'm going to wait at least another week before I try it. Another unexpected benefit is that I've lost 4 pounds. Now maybe I was bloated or something when I started, but I'm still happy about it! Believe me, with all the cold weather, I haven't exercised at all, so losing weight was a total accident.

I'm already planning long-term for being gluten-free. Today, since we're snowed in with a foot or so of snow and more expected, I'm prepping more meals based on an idea I read about here. I've already made two mini meatloafs (2 servings each) and 2 packs of meatballs. Today, I did two chicken breasts with fajita seasoning. One will be cooked up for fajitas with corn tortillas; the other will make a lovely pot of my famous tortilla soup. Next, I am making chicken enchiladas and a dish called King Ranch Chicken, which is like lasagna made with corn tortillas and a white sauce.

I've been cooking almost every day, which is great when I'm not working, but since I start classes again on Jan. 24 (yay!), I figured I'd try this food prep method to make it easier when I'm busier. I'm trying to stay far away from overly processed foods, and if I do the prep, at least I know for sure what's in it. We haven't tried any frozen gluten-free meals just yet, and I'm sure there are some available, but I'm not rushing to fill my house with expensive processed foods when I can just as easily make it myself. I worked as a cook for many years, and I love to do it. All of these frozen items (which should keep for 2 - 3 months) will be for those inevitable days when I just don't feel like cooking.

08 January 2011

Day Four: Gluten Free Diet

Well, it's the fourth day of me being totally gluten-free, and I have to say that I'm feeling pretty good! Considering that yesterday was the first day I hadn't had a stomach-ache since before the holidays, I'm pretty happy so far with the results of my gluten-free experiment. I'm definitely still not 100%, but I feel better today than I have in at least a month. It might just be a mental thing, since I'm doing something that theoretically will help, or I'm just really gluten-intolerant. Regardless, I'm sticking to the new way of eating. And I'm serious about it, too!

For one thing, our kitchen is now entirely gluten-free! I decided that in order for this test to be worthwhile, I had to be hardcore. Sure, I could have boxed up my gluten-free pantry staples and hid them away for the month... or just tried to ignore all that yummy pasta I couldn't eat... but I decided to get rid of it. Why tempt myself? Plus, I'd need the limited kitchen cupboard space for gluten-free items.

I'd noticed a "Feed Your Neighbors" box about a mile from here a few months back. It's just a wooden box, about 3 foot wide by 2 feet high, sort of like a rabbit hutch. In the summer, I'd see fresh produce, mostly just a few things here and there, but then it started to have more items. And, since the items weren't always the same, I figured people were actually using the box. I never took anything from the box, because I didn't need anything what with my farmer's market basket every week, but I've been meaning to add to the box ever since I noticed it. Well, we just filled it up! I had boxes of cereal, pasta, and grains, all unopened, and canned goods with pastas. Nick just went with the last of our gluten foods, everything from the fridge or freezer that we thought someone might want to use. We saved a couple goodies for Nick's mom and my friend, Jen, but other than those few things, our house is free of gluten.

Secondly, I hosted my very first Bling Bling birthday party last night. It was for one of my "Bling Bling graduates" and her friends/family. We made buttons, magnet rings, and bottle caps. I set up a table in their living room and the kids were surprised and delighted to be making crafts with me. Most of the kids were younger, too, which was a new experience. But it went so well! I had a blast, the kids had a blast, and even the grown-ups loved it, since the kids made cute jewelry as gifts for them. I definitely hope to host lots more parties in the future! One thing that I anticipated was birthday cake.

I knew I'd be offered food at the party, and I also knew that I'd have to refuse it. I thought about it in advance. I could have said I wasn't hungry or made up an excuse, but I decided to be straight up and explain that I was gluten-free. I made a joke of it, saying I couldn't eat anything good, and I'm pretty sure no one was offended. The cupcake table was so pretty I took a picture of it, and I was so sad not to be able to eat one of the guava filled delicacies. And, sure, since this is an experiment, for now, I could have ate a cake to be polite (and to satisfy my sweet tooth), but I know that this experiment will be useless if I'm not a total nazi about every single thing I put in my mouth. In a way, I feel like I passed a test by saying no to the cake and the amazing empanadas I was offered. Especially since I was HUNGRY! Still, I stayed to sing happy birthday, of course!

In the realm of gluten-free, I have discovered a yummy snack: Blue Diamond almond Nut-Thins. They are pricy, at $3 for a 4 oz box, but I'll just eat them occasionally. I'm pretty sure I have to get used to lots of stuff being pricey if I'm sticking gluten-free. Nick's friend, Rose, said one of the hardest things about the gluten-free diet is getting used to paying a lot for bread. Speaking of, today I am making gluten-free bread in the bread machine my mom gave me over the holidays. I'm using a mix from Bob's Red Mills. I'll confess that I don't have high hopes for the bread, but my mom gave me the mix so I figured I'd try it.

In the crockpot for dinner, I have a weird dish: Groaty pudding made with salmon and cream cheese. If you don't know what Groaty Pudding is, well, it's probably best described as beefy oatmeal. And if that doesn't sound appealing, you aren't alone in that sentiment. Nick wasn't excited about it either, when I made it over the holidays. He agreed with me though: it is delicious on a cold and snowy day like today. Sometimes I make it vegetarian and sometimes I use beef, but today, I decided to see what would happen if I used salmon, since I found an ancient packet of fish in my freezer, and cream cheese, since I won't be using it on bagels anytime soon (or ever... nooooo!). I'll update with how it turns out.

UPDATE: Wow! The Bob's Red Mill bread is AWESOME. It smelled great, looked like "real" bread, and tastes fantastic. I was worried because of the bean flour, but really, this stuff is good. I had some hot out of the bread oven smeared with red pepper jelly then served nice thick slices with our dinner, which I'm calling Scandinavian Groaty Pudding. It was delicious!

Etsy Tips & Tricks #6: Testing Your Tags

If you're committed to consistently spending time growing your Etsy business in 2011, make sure to spend some time working on tags. Tags are the lifeblood of your Etsy shop: if you aren't using the right tags, your potential customers will never find you.  While every single Etsian seems to have his or her own theory about how to use tags most effectively, one thing's certain: you gotta have tags to make the sale.


First and foremost, don't use inappropriate tags for your items. If you are selling a pair of rainboots, don't tag them with the word "umbrella" in the hopes that someone looking for an umbrella will find them. While that could work, you're more likely to find your item getting flagged for having bad tags. If, on the other hand, you are selling a painting that includes a girl holding an umbrella, by all means, use the word "umbrella" as a tag.


So how to figure out the best tags to use for your items? First, think like a buyer and imagine that you wanted to buy your item. What words would you search for to find it? Try the search and see what comes up. If you find a bunch of items that are close to yours, you are on the right track. If there's nothing close, you are either completely unique and original (which is possibly, but honestly, unlikely) or you need better tags. Ask your friends and family what words come to mind to describe your items. Try searching for those.


Learn from others. Find someone selling an item similar to yours and see what tags that are using. I'm not saying you should completely copy someone else's tags, of course, but you might get inspired by seeing how someone else described a similar item. A word of warning though: just because someone else is using those tags doesn't make those tags automatically the best tags to use. Use your best judgement.


Speaking of tags, don't always use the same tags. You can use the same basic tags, but mix 'em up a bit. You'll find that some items get lots of views and some don't get any. When you sell an item, analyze your tags to see how they differ from the items that keep getting relisted without selling. If you offer free shipping, use a tag that says free shipping. (Don't use that tag if it's not free shipping though!). Use the most relevant tags you can. Not sure what tags to use? I keep a "tag recipe" next to my computer, use these in order as relevant to your item:

item
material
type
color
design
size
style
occasion
use

Try to think of other words that people might use to describe your item. Sure it's a purse, but maybe it's also an evening bag, a hobo slouch, or a wristlet? If one of these "ingredients" isn't relevant, skip it and add something that is. I try to use a lot of different color names, if I can. It's not just pink, it's salmon pink. It's not blue, it's cerulean or turquoise. Using good colors seems to get my items into a lot of treasuries, too.


One final thought: Etsy allows you to include 14 tags with each listing. Use 'em all! Do your best to come up with as many good tags as you can. Analyze every little detail about your item so that you can use tags to your best advantage.  Check out Craftopolis to track what tags people are using to find your items. Stick with what works and find something new to replace what doesn't.


Want to learn more about tagging? Check out the Etsy forums and you'll find LOTS of information from lots of sellers. Here's a great post with 6 tips for tagging. Here's the official Etsy tagging rules.

07 January 2011

Recipes: Pizza For Breakfast

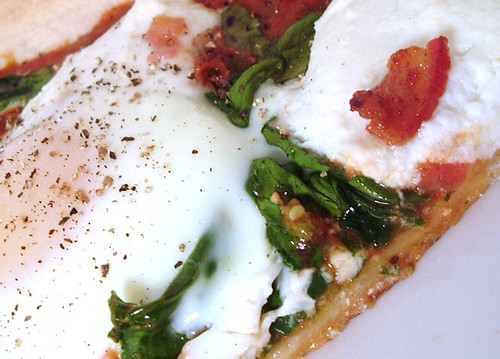
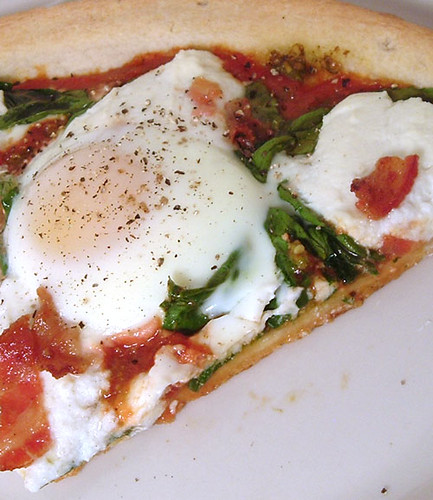
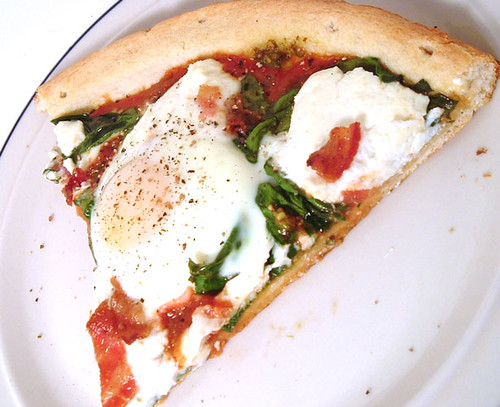
breakfastpizza2

Have I ever mentioned how much I love pizza? It's the perfect food: completely versatile and easily adaptable to practically any ingredient you can throw at it. There are sweet pizzas and savory pizzas, carnivore pizzas and veggie pizzas. And the thing about pizza is that even bad pizza isn't usually all that bad. It might not be your favorite pizza and you'll never order it again, but, hey, it's pizza!

I woke up crazy early this Sunday morning, so I decided I'd make a cold basil-spinach pasta salad to serve as quick lunches this week, since I know I'll be busy with classes starting tomorrow afternoon. The recipe called for bacon, so I decided to throw the rest of the package in the oven and use the extra for breakfast. There wasn't really enough bacon to make omelets or anything so I looked in the fridge to see what else could work for breakfast. I had a pizza crust, and since I love cold pizza for breakfast, why not hot?

breakfastpizza1

I found a Breakfast Pizza recipe on Apartment Therapy's The Kitchn. I had everything I needed on hand, but I knew I wanted to add some pesto, since I have tons of it on hand! Here's how I made my delicious breakfast pizza.

You'll need:
1 pre-made pizza crust
2 T. basil pesto
4 T. spaghetti sauce
handful fresh spinach
handful fresh basil
8 oz. fat-free ricotta cheese
4 slices bacon, cooked, chopped
4 eggs

Preheat the oven to 500 degrees. If you have a pizza stone, place in on the lowest oven rack while the oven preheats. No pizza stone? No worries, just use a pizza tray or cookie sheet.

Spread the pesto on the crust. Add the sauce. Layer the spinach and basil around the crust until it's covered. Keep the spinach / basil in a single layer. Add small dollops around ricotta cheese on top of the spinach / basil layer. Sprinkle the bacon on top of the cheese.  Put the pizza in the oven, then crack the eggs carefully on top of the crust, staying away from the very edge, but keeping them evenly distributed around the pizza. Cook until the egg yolks are just set, about 7 minutes.

Sprinkle with smoked salt and black pepper to serve. You could add parmesan cheese, too, if you wanted. Enjoy!

breakfastpizza3

06 January 2011

Day Two: Gluten Free Diet

Ugh. Today is day two of my gluten free diet, and I'm miserable. I woke up with a splitting headache, one so bad that I wasn't able to fall back to sleep and felt sick to my stomach. (And, no, I'm not suffering from a hangover; I hardly ever drink these days.) I emailed to reschedule my lunch time appointment, popped two headache pills, drank as much water as I could stomach, and crawled back into bed. Not that it helped, because I couldn't sleep.

Still, the pills kicked in eventually, so I got up to make my first gluten-free bread: English muffins. They came together easily, looked and smelled great hot out of the oven, but the taste? Not so hot. Plain, they tasted alternately bland and chemically. No wonder Nick pulled a face... haha! An hour later, I tried one lightly toasted and smeared with yummy red pepper jelly. They were better, mostly because the strong flavor of the jelly covered the nastiness, but they still left an aftertaste that stayed in my mouth for a while. I'd give 'em an "okay" at best. Maybe I'll try a different flour combination next time.

For lunch, I made a vegan caesar salad with eggplant bacon from Isa Chandra-Moskovitz's newest cookbook, Appetite For Reduction. The eggplant bacon was good enough that I ate a whole serving of it just snacking, but the dressing wasn't the best. It's probably because just a few days ago I had a "real" caesar salad at Red Lobster, so the taste is fresh. Also, I didn't have capers so I used olives instead. Maybe those capers really make a difference.  At least it didn't have tofu in it?

I just finished making dinner, and I have to say, it's not appealing. Nick assures me that it tastes better than it looks, but it looks, well, disgusting. I made eggplant and chickpea curry and a cranberry and cashew biryani, again from Appetite for Reduction. The biryani looks okay, but smells kind of burnt, while the curry looks like, well I'll just say it, feces. Yuck. I can't even bring myself to eat it. I'll probably get hungry enough soon to at least try the biryani, but I think Nick's going to be eating curry leftovers for a few days.

Oh well, I'm not all that surprised. Despite my British heritage, me and curry don't mix very well. I like the idea of curry. I like the smell of curry. But I don't really like eating curry. I've had a mango chicken curry in a restaurant that was nice, and my aunt made an awesome chicken tikka (I think?) that I loved. Oh, and I love Chana masala from Trader Joe's, and even then, only with chutney, but that's the limit of my curry tastes. Anything remotely tongue-burning and I won't be eating it. And now that I'm gluten-free, at least for the month, I can't eat Na'an bread either. Blah.

I was going to try making a GF flatbread using a recipe online, but after the English muffins, I was kind of scared to try it. Maybe tomorrow I'll be more adventurous, but I think tonight's dinner will be Greek yogurt and a banana.

05 January 2011

Day One: Gluten Free Diet

http://glutenfreeeasily.com/july-go-ahead-honey-its-gluten-free/
So, anyone who knows me probably knows that I'm not feeling well a lot. Sure, I get a regular run-of-the-mill cold or flu now and again, but most of the time when I'm sick it's a general malaise and/or stomach and digestive issues. And headaches, ugh. I'm frequently missing events, meetings, and gatherings because I'm not feeling up to it. About a year ago, I went to the doctor and had a run of tests, all of which were inconclusive. I was getting frustrated with having all this problems, the most prominent being a persistent and nagging pain in my left side just under my ribs, and when my doctor suggested, I kid you not, that I might be suffering from anxiety and hypochondria, let's just say, I never went back.

Hypochondria? Was she kidding me? I HATE being sick, I HATE going to see a doctor, and, in general, I'm pretty healthy. For me to be going to a doctor regularly and having all these tests done told me that I must have something wrong, because the number of doctor's visits I had in that 6 month period was definitely more visits that I'd had over the course of the previous 6 years. I started thinking about all the med-school students who had been my dorm mates at YSU, the ones who'd partied all hours of the night, puked all over the bathrooms, and squeaked by in their classes, and I thought, you know what, there are probably just as many, if not more, bad doctors out there as there are good ones. My doctor was a very nice person, I suppose, but I just don't think she was a good doctor.

Am I saying that I'm smarter than my doctor? No, not exactly, but I also don't think that the answer to every problem is a prescription, which is what my doctor when I was a teenager seemed to think. He never told me what was wrong with me, just wrote a prescription for antibiotics every single visit. I stopped going to see him, too, except when I needed a note to excuse an absence from work. My most recent doctor insisted my problem was heartburn. Yeah, I know that that feels like lady, and this wasn't it. And, if a patient has a persistent complaint about abdominal problems, and only abdominal problems, why wouldn't you investigate all possible causes before accusing said patient of making it up? Grr. The only time we talked about my diet was when she gave me a diagram of a plate showing proportions of food, because, you know, if I'm overweight, I'm obviously stuffing my face full of Big Macs all day long. (I'm not.) When I suggested that the weight gain might be a symptom, she laughed. Really.

So, I'm still having problems, have been having issues for a good two years, possibly longer. I've altered my diet in different ways, trying to find a possible food source for my issues, but one thing I haven't tried, until now, was a gluten-free diet. I think I figured that if I was gluten intolerant, I'd have figured it out by now. But then I started researching gluten intolerance, and I realized that many people who are diagnosed with gluten intolerance, gluten allergies or celiac disease frequently have a 10 year period of suffering through it before getting a diagnosis. TEN YEARS!

I'd looked at the symptoms of gluten intolerance before and some of them fit, many, really, except one noticeable one: unexplained weight loss. Yup, that doesn't fit me. If anything, I'm the exact opposite: I've gained much too much weight in the past few years. It doesn't seem to matter what or how little I eat, every time I step on the scale, the numbers go up. So I figured no way could I be gluten intolerant. Last month, I decided to research again and found a number of sites listing weight gain as a symptom of gluten sensitivity. Hmm. Combine that will everything else and there's a good chance that's my problem. And since I eat a lot of whole grains and pasta, if I am gluten sensitive, I've been basically poisoning myself every time I eat. Yikes!

So, since gluten free diets also have benefits for people with autism, like my fabulous boyfriend, Nick, who has Asperger's, we are both trying out a gluten-free diet for the next month. We tried vegan and that didn't really work out, but I'm committed to really being a stickler about gluten-free, because I know if I am gluten sensitive, even the smallest amount of gluten will give me symptoms. So I bought a bunch of gluten-free pastas, made from corn, quinoa, and brown rice, plus an assortment of gluten-free flour so I can try making my own bread and other things.

Also, I'm planning on using a lot of recipes from Appetite for Reduction, the newest cookbook by Isa Chandra Moskovitz, since a lot of them are already gluten-free, and I made a meal plan for the first week so I don't have to have a mini-panic attack like I did last night when we got home from driving 10 hours. I was hungry and I didn't know what I could or couldn't eat yet. I ended up finishing my non-gluten-free sandwich from lunchtime and promising to start fresh today using the meal plan I made.

Wish me luck! Any one have any favorite gluten free resources or recipes they want to share?

03 January 2011

Awesome Etsians #3: Artvision

I'd like to let you in on a little secret of mine. See this photo of my "She Must Make (f)Art" pocket mirror:

She Must Make (f)Art
copyright Moira Richardson 2010 - 2011


It "looks" like I finally figured out how to take great pictures of my pocket mirrors, but here's the secret: I actually used a template from Artvision to create this image. Artvision digital photo templates are high-resolution images that you use to create an image of your product. This won't help you if you make only one-of-a-kind pieces, but if you make something like my pocket mirrors, an item that you can sell over and over again, you'll love never have to take photographs of your hard to photograph items.

Buttons are a HUGE pain to photograph. I'm always getting a glare or a slightly blurry image. It's gotten a lot easier since I got my light box, but it's still something I'd rather avoid when I can. Why waste my time photographing mirrors when I can be working on another aspect of my etsy shop? Now I never have to photograph pocket mirrors! I just use my scanned image of my original collages, import them into the template, and save the image under a new name.

Artvision currently has 161 different template available for sale, so you're sure to find something that meets your needs. If you make glass pendants, Scrabble pendants, or buttons, you'll definitely want to check out Artvision. In addition to the template, Artvision sells a wide range of digital collage sheets in popular sizes.

01 January 2011

Etsy Tips & Tricks #5: Consistency is Key

If your New Year's Resolution is to kick your Etsy sales up a notch, you've come to the right place! I've been actively running my Etsy shop for just over one year now, and I've definitely learned a lot in the past year. If I had to give only one piece of advice to a new Etsy seller, it would be this: Consistency is Key. 


I'll admit it: I haven't been a particularly consistent Etsy seller. I tend to get all excited about something, like selling on Etsy, put a lot of time into it for a few days or weeks, and then promptly forget all about it. While there's something to be said for the idea that having something listed on Etsy is better than nothing, you'll fare a lot better as a seller if you are consistently listing new items and renewing old ones.


If possible, it's definitely best to add new items often and consistently. I don't always do this, but I make the most sales when I do. Instead of posting 20 items all in one day and then nothing for a few months, you'll have much better luck if you post one item every day for 20 days. This ensures that your listing stays close to the top of searches. Once you get buried, it's really hard for your potential customers to find you. If you don't have that many items to sell, but you sell multiples of that item (like custom necklaces or something), relist that same item a few times, but maybe vary the first picture with the listings. I currently have my custom dictionary brooches listed about three times.


How to maintain consistency? Set a schedule for yourself and stick to it. This is something that I didn't do in the beginning, which is why I had sluggish sales. Sure, I sold a few things a month, sometimes a few things a week, but I could have been doing a lot better all long if I'd be more consistent about my time spent on Etsy. Think of it this way: the more time you put it, the more you'll get out. Try and devote at the very least one hour a week to working on your Etsy shop. Very likely, you'll find yourself spending more time, but stick to that one hour a week thing on the weeks when you are insanely busy. Tell yourself it's only an hour and just do it already!


What to do in that one hour? Add new items, renew current items, and research tags. Find people who are selling items similar to yours and see what they are using to tag their items. Check out Shades of Color on Wikipedia and make sure you are tagging your items with the best color words you can. Improve your photography skills. Build a lightbox if you don't already have one and practice, practice, practice. You don't even need a fancy digital camera: mine is a Fujifilm A205 which sells for about $40 on eBay. I love it! Improving your photography skills is probably the number one thing you can do to improve your chances of success of Etsy, so add it to your to-do list.


Make a commitment today to spending at least one hour every single week this year working on your Etsy shop. Stick to you and come back 52 weeks from now and tell me how your year went! I'm willing to bet that if you commit to actively improving your shop, you'll see improved sales numbers to match that effort!
That being said, there's definitely merit in sometimes posting a whole crapload of items all at once. Over the most recent Black Friday weekend, I decided to take the opportunity to really beef up my store. I had tons of items in my inventory from my summer sales and have been meaning to post 'em online for months. I posted over 100 items on Black Friday alone, which was, well, crazy! But you know what? I made 12 sales, the most I've ever made in one day (or, hell, one week!), so the overload strategy must have worked. In the week following Black Friday, I made over $500 in sales, which was probably more than I made in the whole year prior to that one crazy overload Etsy day.

I read in the etsy forums a post by a successful seller who said that if you aren't paying a lot in fees, you aren't listing enough on etsy. That totally makes sense to me! My etsy bill is currently $75 or so, but I easily covered that from my Black Friday sales & all those items are still good for 4 months, if they don't sell sooner. Totally worth it.
Related Posts Plugin for WordPress, Blogger...