I'm so happy that the holidays over that I decided to hack up my Christmas cards:
One of my goals for 2012 is to post at least one freebie video tutorial each month!
In other news, Weekly Art Date is off to a great start. We've already had two videos and I started a cool month-long journal spread. It's not too late to sign up, since you can work at your own pace and keep all of the materials. You can learn more here.

Showing posts with label tutorials. Show all posts
Showing posts with label tutorials. Show all posts
02 January 2012

09 September 2011
Tutorial: $5 Camera Stand for Videos
I have discovered that I really love watching people's art journaling videos, and so I wanted to start making some of my own. There's just something really cool and fascinating about watching a video of a piece of art from blank canvas to a finished state. The problem that I'd been having with making videos is getting the right angle for the shot. I couldn't quite figure out how to have the focus be on the artwork without having it at a weird angle for the viewer. Plus, I didn't want to have to work on it at a weird angle, cuz that would be awkward.
Nick has a giant tripod which I'd been using for my videos, which works well, but I really wanted to be able to focus more on the artwork and less on whether or not I had too much cleavage showing. To be honest, I don't want to be in my videos at all! Well, except for my hands... those clearly need to be involved because I have not yet mastered telekinetic art making.
I knew I needed to have some sort of overhead system, but I wasn't quite sure how to make it work.... until I saw a photo of a makeshift set up on Julie Fei-Fan Balzer's blog:
I was going to rig up my own system, maybe without the bananas, but then I realized that I could very likely build a satisfactory setup using just a few things from the local hardware store. I found this tutorial which would definitely be way sturdier overall, but I didn't want to work with metal because it would be more expensive and more of a pain to try to drill, etc. It was a huge help to learn that a 1/4 inch bolt was what I'd need to screw my camera onto the stand, just I hadn't quite worked out how I was going to do that.

My journal pages are 8 x 10, which means the spread is 10 x 16, just to give you a sense of scale. If you were using a smaller journal, you could get away with a smaller camera stand, I bet. If you need a larger area, you'll need a larger stand. In order to figure out the height, I turned my camera on and held it up over the journal until I got just the right view. [I added 1 extra inch, but if I were to make this again, I'd add an extra two or three, just to enable me to zoom in on a single page if I wanted.]
To build one just like mine, you will need:
1 - 1x2x8 pine board cut into the following lengths: 2x20inches, 2x10inches, 1x24inches + remainder scrap*
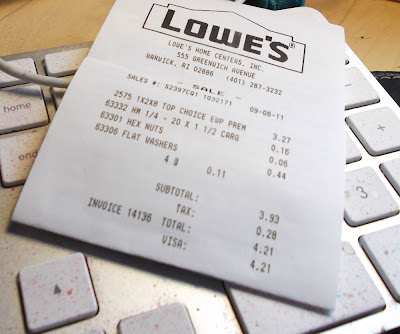
1 - 1/4 inch x 1.5 inch bolt (#63332) +
1 - 1/4 inch hex nut (#63301)
2 - 1/4 inch flat washers (#63306)

For these items, my grand total came for $4.21 for this project. (And I bought two extra washers.) If you don't already have 8 screws (1.5 inches or so), you'll need to get those, too. I am assuming you already have a power drill. If not, you might want to borrow one from a friend. You could do the screws by hand, but you will need to be able to drill a 1/4 inch hole in the frame for the bolt.
* I bought my board at Lowe's. They will cut your board for you. The signs always say that you get the first two cuts for free & additional cuts are 25 cents each, but no one has ever charged me extra, no matter how many cuts I've gotten. I do recommend going at a slower time of the day, if at all possible, so you won't have to wait in line.
+ Nick says not to buy galvanized because it's poison. Take your camera with you to test out the bolt to make sure it fits. I'm pretty sure all cameras are going to be pretty standard when it comes to tripod stands, but just in case.
The two 10 inch pieces will be the base of your stand. The two 20 inches pieces are the sides. You want to line up the base pieces so that you'll be screwing through the shorter one inch sides. Attach both bases to the sides using two screws on each then side aside.

Look on the base of your camera to see where the tripod attachment is located. Mine is about 1 inch to the left of the center. Find the center of the 24 inch board then adjust according to the tripod base. Doing this ensures that your camera, when attached, will be positioned in the center. (I.e. for my camera, I'll move the measurement 1 inch left before drilling.
Drill a 1/4 inch hole at the mark you made in the last step. You will drill the whole way through the 1-inch wide part (i.e. in the middle of the 2-inch wide part). Use the scrap piece of wood from the 1x2x8 to protect your work surface.

Screw the bolt into the hole you just drilled. Add the two washers then tighten with the nut.

Take this piece and position it between the two sides you already created. Use two screws on each side to attach this longer piece at the top of the sides. (Note that it doesn't matter which way the bolt faces at this point.)

Once your entire stand is screwed together, position it on your work surface so that the part of the bolt that you will be attaching your camera to faces away from you. Screw your camera into place and make any adjustments as needed. I found that my camera would occasionally slide down, no matter how tight I screwed it in initially, so I use a big push pin to hold it up. My camera is very light weight and this works very well for me. If your camera is heavier, you may need to putter a bit to make the stand work for you.

Here's what my camera sees from its new position on the finished camera stand. Sweet, right?

Nick has a giant tripod which I'd been using for my videos, which works well, but I really wanted to be able to focus more on the artwork and less on whether or not I had too much cleavage showing. To be honest, I don't want to be in my videos at all! Well, except for my hands... those clearly need to be involved because I have not yet mastered telekinetic art making.
I knew I needed to have some sort of overhead system, but I wasn't quite sure how to make it work.... until I saw a photo of a makeshift set up on Julie Fei-Fan Balzer's blog:
 |
| Photo copyright Julie Fei-Fan Balzer http://balzerdesigns.typepad.com/balzer_designs/2009/07/label.html |
I did a quick sketch of what I thought would work and then Nick helped me figure out the measurements for the camera height and the width of the stand so that it would fit well on my desk. You could obviously customize this to meet your own needs. First, here's a picture of my stand:

My journal pages are 8 x 10, which means the spread is 10 x 16, just to give you a sense of scale. If you were using a smaller journal, you could get away with a smaller camera stand, I bet. If you need a larger area, you'll need a larger stand. In order to figure out the height, I turned my camera on and held it up over the journal until I got just the right view. [I added 1 extra inch, but if I were to make this again, I'd add an extra two or three, just to enable me to zoom in on a single page if I wanted.]
To build one just like mine, you will need:
1 - 1x2x8 pine board cut into the following lengths: 2x20inches, 2x10inches, 1x24inches + remainder scrap*
1 - 1/4 inch x 1.5 inch bolt (#63332) +
1 - 1/4 inch hex nut (#63301)
2 - 1/4 inch flat washers (#63306)

For these items, my grand total came for $4.21 for this project. (And I bought two extra washers.) If you don't already have 8 screws (1.5 inches or so), you'll need to get those, too. I am assuming you already have a power drill. If not, you might want to borrow one from a friend. You could do the screws by hand, but you will need to be able to drill a 1/4 inch hole in the frame for the bolt.

* I bought my board at Lowe's. They will cut your board for you. The signs always say that you get the first two cuts for free & additional cuts are 25 cents each, but no one has ever charged me extra, no matter how many cuts I've gotten. I do recommend going at a slower time of the day, if at all possible, so you won't have to wait in line.
+ Nick says not to buy galvanized because it's poison. Take your camera with you to test out the bolt to make sure it fits. I'm pretty sure all cameras are going to be pretty standard when it comes to tripod stands, but just in case.
The two 10 inch pieces will be the base of your stand. The two 20 inches pieces are the sides. You want to line up the base pieces so that you'll be screwing through the shorter one inch sides. Attach both bases to the sides using two screws on each then side aside.

Look on the base of your camera to see where the tripod attachment is located. Mine is about 1 inch to the left of the center. Find the center of the 24 inch board then adjust according to the tripod base. Doing this ensures that your camera, when attached, will be positioned in the center. (I.e. for my camera, I'll move the measurement 1 inch left before drilling.
Drill a 1/4 inch hole at the mark you made in the last step. You will drill the whole way through the 1-inch wide part (i.e. in the middle of the 2-inch wide part). Use the scrap piece of wood from the 1x2x8 to protect your work surface.

Screw the bolt into the hole you just drilled. Add the two washers then tighten with the nut.

Take this piece and position it between the two sides you already created. Use two screws on each side to attach this longer piece at the top of the sides. (Note that it doesn't matter which way the bolt faces at this point.)

Once your entire stand is screwed together, position it on your work surface so that the part of the bolt that you will be attaching your camera to faces away from you. Screw your camera into place and make any adjustments as needed. I found that my camera would occasionally slide down, no matter how tight I screwed it in initially, so I use a big push pin to hold it up. My camera is very light weight and this works very well for me. If your camera is heavier, you may need to putter a bit to make the stand work for you.

Here's what my camera sees from its new position on the finished camera stand. Sweet, right?

03 September 2011
DIY Makeover: Ugly Office Chair Transformed
The chair I'm currently using at my computer is super comfortable, but, up until yesterday, was super ugly with a faded & stained yellow fabric. The fabric was very similar in texture to burlap (heck, what do I know? Maybe it was burlap?) and thus super uncomfortable to sit on when I'm less than fully dressed. [Nick jokes that I prefer to stay home because I don't have to wear pants here. So true!] I got the chair from a curb alert sometime last summer and have meant to do something about its ugliness every since, but just never got around to it.
Well... as luck would have it, I found an AMAZING zebra print fabric at the recycling center this week. It's white cotton upholstery fabric with black flocked velvet stripes. I paid $10 for a giant roll of it. I bought the fabric thinking of my teen and tween students, because this is some seriously "fresh" fabric that I know they will just love. I made this awesome little purse using only a stapler, some duct tape, a zipper and the fabric:

(Tutorial here)
The more I looked at the fabric, though, the more I thought that I wanted to do something awesome with it for myself. I decided that it was darn well time I covered my desk chair, so even though I have a million and one things to do to get ready for the Providence Arts Festival on September 10, I decided to take an hour to recover my chair.
The project was a little more complex than I'd anticipated, and I actually put the chair back together without the height adjustment lever in place. [Nick fixed it for me later.] I had the darndest time trying to remove the staples on the bottom of the seat, and after a few frustrating minutes, I decided to just staple the new fabric over the old fabric, being careful to avoid the old staples. Still, even with a few hiccups, the chair turned out GREAT!
With just a staple gun, scissors, a socket set (is that what it's called?), and my new fabric, I changed dull and dingy to fresh and fabulous.
Before:
After:


Awesome right? I used this tutorial from Curbly. I definitely recommend you give it a whirl if you want a quick update to your space for very little money. I am seriously considering doing my couch in the zebra print next. Hmm...
Well... as luck would have it, I found an AMAZING zebra print fabric at the recycling center this week. It's white cotton upholstery fabric with black flocked velvet stripes. I paid $10 for a giant roll of it. I bought the fabric thinking of my teen and tween students, because this is some seriously "fresh" fabric that I know they will just love. I made this awesome little purse using only a stapler, some duct tape, a zipper and the fabric:

(Tutorial here)
The more I looked at the fabric, though, the more I thought that I wanted to do something awesome with it for myself. I decided that it was darn well time I covered my desk chair, so even though I have a million and one things to do to get ready for the Providence Arts Festival on September 10, I decided to take an hour to recover my chair.
The project was a little more complex than I'd anticipated, and I actually put the chair back together without the height adjustment lever in place. [Nick fixed it for me later.] I had the darndest time trying to remove the staples on the bottom of the seat, and after a few frustrating minutes, I decided to just staple the new fabric over the old fabric, being careful to avoid the old staples. Still, even with a few hiccups, the chair turned out GREAT!
With just a staple gun, scissors, a socket set (is that what it's called?), and my new fabric, I changed dull and dingy to fresh and fabulous.
Before:
 |
| I wasn't using it like this, but I had already taken the top off before I thought to do a before/after shot! |


Awesome right? I used this tutorial from Curbly. I definitely recommend you give it a whirl if you want a quick update to your space for very little money. I am seriously considering doing my couch in the zebra print next. Hmm...
05 August 2011
Art Journal: DIY Copic Airbrush System ABS
Okay, so I have been coveting a Copic Airbrush system ever since I saw some awesome pages made byJulie Fei-Fan Balzer using her Copic ABS system. I didn't think I was interested in airbrushing, but all of a sudden, I wanted one hard! I even got to the point of bidding on them on eBay, even though we all know I'm not supposed to buy any more supplies until September 7th!
Of course I know that I don't need the airbrush system to make awesome art and I should be perfectly happy with all the wonderful supplies I already have... but that didn't stop me from researching the system. The Copic ABS actually hasn't gotten a lot of positive reviews on the various review sites I checked. I figure, though, that a lot of it depends on what you are expecting: it's not a regular airbrush system and it won't work the same.
The problem I had with it though it that it wasn't the type of thing you could buy once and not have to spend anymore money! You'd either need an air compressor, which I don't have and retails from $100 - $300, or you'd need to buy replacement cans of air all the time, which are $9 - $15 each. Also, you can substitute another brand of air; only the Copic ones will work with the system.
So I started researching DIY methods, and didn't find much, just this video on using canned air, which I like, but it's awkward. I wanted to have a free hand to hold my stencils or masks in place. (Also, since I can't really imagine buying air in a can, I was happy to find that my boyfriend had no such qualms!)
I thought, "Hmm, what can I use?", thinking I'd have to build some kind of rig, then noticed a stretchy headband on my desk. Eureka! I did a little experimentation, and here is the result:
(I'm having camera issues.. will update this soon with the photo!)
I am so stoked with this method. Sure it means that when I run out of spray, I'll probably, gulp, buy another can of air, but I figure I can buy 5 cans of air before it equals the cost of the original set up... and even with that I'd be buying air. Perhaps I'll save for the air compressor set up... or maybe I'll be bored with it by then. Who knows!
30 July 2011
Art Journal: DIY Spray Paints
Here's another video! This one shows ways to make your own spray paint. Enjoy!
29 July 2011
Art Journal: DIY "Washi" Tape
Admittedly, this tape doesn't have the wonderful translucent quality that makes washi tape so awesome, but it's a great way to get the cool look of the tape without the big bucks! This video was made for Mission Nine of the 30 Day Craft Cleanse. If you aren't already a member of this FREE art journal class, you should check it out!
02 February 2011
Iron Craft #5: Simple, Cute Valentine Card Tutorial
 |
| Originally uploaded by literarytease |
I followed this wonderful tutorial by Kelli Nina Perkins to create dyed non-fusible interfacing, even though I didn't know what I was going to do with the interfacing once it was done. So far, I've used it to make super cute fabric beads (tutorial coming soon!) and this fun Valentine's Day heart.
It's simple, but sweet, and, best of all, only took about 10 minutes to finish. (Don't worry, I put a lot more time into the accompanying gift!)

It's very simple to make your own.
You'll need:
dyed interfacing, or, if you don't want to try that, any scrapbooking paper or fabric
needle and thread
scissors
blank card
buttons
Simply cut the shape of your choice out of the fabric/paper. I did a heart, but you could do a star, a bell, a ship, or something else entirely.
Sew the shape to the card. You could, if you wanted, use your needle and a cutting mat to punch holes around the perimeter before you start to sew, which would probably make things much easier, but I just held the card up to a sunny window in order to see where to bring the needle up from the back.
I didn't knot the end of the string either. I left a long tail, did the first couple stitches carefully so as to not pull it through. When I finished, I tied the ends together in a double knot.
Sew on buttons or other decorations. (Ideas: sequins, charms, shrinky dink pieces)
You can make this card look finished on the inside by cutting a piece of paper to fit and using gel medium to coat the back of the stitching and covering them with the paper. Another thing that would be cute would be to cut a piece of vellum the same size as the card and sewing it in with a pamphlet stitch.
30 December 2010
Artsy-Crafty Link Round Up #3
It's almost time for another session of Bling Bling jewelry classes, so I've been thinking about what projects I think the kids would like to learn. I've found a bunch of cool fabric jewelry ideas that I think we're going to try, and not just because my supply budget was cut. I want to encourage the students to recycle and refashion their old stuff and thrift store finds, so I'll be taking in stacks of old jeans, vintage t-shirts, and scraps of fabric to see what they come up with.
Here's a round-up of fabric jewelry tutorials on the web:
There's a lot of potential with this idea: use fabric that matches your favorite outfits or go for a monochromatic look. I like the way fabric and metal blend in this necklace, and I think it's easy enough for my middle school students to master. Definitely on my list of projects to try this month.
I'm actually not sure if I even like the look of these, but maybe in a different fabric, these could be cool. Also, this might be great adorned with rhinestones, since the kids love those. I'll have to try making them to decide if my students would have the patience to try 'em. They don't look all that different, but the author says a few times how time consuming they are, so we'll see.
I think these are super cute, but I don't know if the kids would be into them or not. I thought the cupcake necklaces would be a huge success, but I'd say they were 50/50 on whether or not they liked them. Of course, most of the kids want to make gold chains and diamond bling, so it's not exactly the style they like. However... a rhinestone or two might change everything!
With the right choice of fabrics and paints, these could be a good project. I think we'd make a long necklace out of these instead of bracelets, since I think that style would be good, since a lot of the kids are rockin' an 80s vibe these days. Seriously, am I doomed to forever be in junior high? Haha!
I love the look on these necklaces, but I'm not sure that the sewing technique is going to work with the kids. However, I think if we used recycled t-shirts (i.e. jersey), we could do the knots from the other tutorials. And sewing the fabric flowers might work okay, but the kids did a great job with the felt flower headbands we made last term. As long as it's an "instant gratification" type project, they'll love it. And the flowers are super cute, so I bet it will be a good project. I'll be making samples soon.
I like the idea of a bib necklace from fabric flowers, and I have a bit of leftover wool felt from last session. I'd definitely leave out the lace, but I like the fact that the students could completely personalize the necklace to suit their style by choosing colors that work for them. I have a huge box of scrap fabric that I couldn't bear to throw away or recycle, so I know I have lots of options.
I like this design better, but it's a little advanced. I know some of the students would dig it, others wouldn't want to take the time to add all the details. Still, I love that it incorporates beads and buttons!
I kinda like the flower technique in this tutorial, though we will not be burning any edges in class, haha! Though that makes me wonder if we could dye the edges using a stamp pad or paint, so will have to try it! Love that the author saw a necklace she liked and didn't want to pay for so made her own. That's the ingenuity I'd love to inspire in my students!
I think this would look cute with some beads sewn in the middle or maybe some rhinestones, cuz the kids love those. Color choice would definitely influence the style factor of the design, too.
I love this, but don't know if it would be a good student project. It would be cool to offer up as an "advanced" project though.
23 December 2010
Artsy-Crafty Link Round Up #2
I'm constantly finding cool projects I want to try, so I figured I'd share some of my favorites here. These are all projects that would be great for a rainy Saturday afternoon. Or a snowy Thursday. Whatever.
I've seen the awesome Japanese fabric tape on Etsy and totally love it, but what am I ever going to do with it and don't I have enough tape already? Well... now I can make my own using supplies I already have around the house. LOVE it!
I've made these before, and chances are good that you have, too, but it's been a while and I still have a giant 3-lb coffee can full of glass marbles somewhere around here. Plus I want to make sure I remember to check out this site again!
Well, I'm pretty sure my landlord would not be cool with me decorating my house with Sharpies, but what a cool idea! If you own your own house, you should try this. An apartment-sized version would be to make a smaller framed piece. Still awesome. Sharpies rule! I have like 50 of them on my desk!
Way better to paint with corn syrup than to ingest it, right? Seems like a fun project, especially with kids. Might be nice to make a custom set with your favorite colors, too.
I suspect this might be an excellent project for me to try, especially since I have way too many dictionaries in my house just waiting to be crafted. A good use for dictionaries that have already be scoured of all the "good" words. These will be super cute as earrings!
I've done this project before, too, but I love the nifty little way that the tube of fabric covers all the joins at the back of the necklace! I made mine with scraps of random fabric, but a t-shirt will be nice and soft. These make great headbands, too!
One of the first crafty projects that Nick and I made together was books from cereals boxes based on a pattern in ReadyMade. This version is decidedly more stylish.
16 December 2010
Artsy-Crafty Link Round Up #1

I'm marking this one because it reminds me on these awesome woven stretch bracelets that my former roomie, Melanie, taught me how to make. She made a loom very similar to this, only much smaller, and used stretch cord. I never did master the technique, but I definitely want to try it again!
This will be a perfect project to use up some of the smaller scraps of fabric that I have in my house. I can't bring myself to throw (or give) away super cute fabric, but what the heck am I going to do with it? Now I know! Also, I really wanna get organized, and I think these baskets would be great! Stylish!
I just think my students would LOVE this cute little project, and I'd love an excuse to buy a bunch of awesome buttons. Always eye 'em up, but unless I have a purpose... Cute!
I have a purse that has these embroidered mirrors on it, and I always get so many compliments. I love that I could try this technique with all the vintage coins I have lying around my house! Fabulous!
I think there's a lot of potential with this project! Unfortunately it wouldn't work for my Bling Bling classes, since it takes a long time both to make and to dry, but I can see me making these just for the heck of it. I dunno, maybe I could adapt it for class use?
I made a jewelry display very similar to this board, but I wouldn't have thought to turn into into an inspiration board when I was done using it for jewelry. Love the idea!
I'm so freaking cheap that I just don't want to pay $5 for a crap cardboard magazine holder, you know what I'm saying? I currently have three magazine holders: 1 trashpicked, 2 picked up for 50 cents each at IKEA, but if I end up with more magazines, I'll be making one of these!
These are just so cute that I had to post 'em here. I love the idea of making my own tote bags; whether I'll ever get around to makin' some is a completely different story.
Oh man, I'll never get anything done if I keep looking at all the awesomeness that this blog has to offer! Just visit and you'll see why! Fabulous!
14 December 2010
Almost Free Bling: Make Your Own Shrinky Dinks Bling

Yo! If you wanna make your ass some fresh ice without having to drop some mad green, this bangin' Shrinky Dink tutorial is for you, kid.

Make Your Own Shrinky Dinks Bling
Or, how to Make (fake) Bling Without Breaking the Bank
You'll need the following materials:
Frosted shrink plastic - 1 sheet
Black permanent marker
Tacky glue (I used Aileen's Fast Grip)
Assorted plastic rhinestones (at Michaels, for $3 for a package of 144)
Scissors
Hole punch
Jump ring (approx. 7 mm)
Ball chain necklace
Parchment paper or a non-stick craft mat
You'll also need access to an oven or toaster oven.
Draw your design on a sheet of scrap paper. I made a money sign because I'm so money, baby. You could also find a great free font online with Grafitti style lettering (mine's called Graffonti) and make a bling initial necklace. The size of my design is an 8.5 x 11 sheet of printer paper folded in half. Your design will shrink to about a third of the original starting size. (You'll see an example later to help you gauge.)

Once you have a design you like, trace the design onto the shrink plastic.

You can actually draw on either the frosted or the non-frosted side of the plastic, but I recommend the frosted because it smears less.

In order to converse your shrink plastic and have enough left to make another sick pendant, keep your design as close to the edge as possible. If you want to add additional colors to your design, you can use colored pencils or permanent markers to do so.
Next, carefully cut around the edge of your design. Be careful with corners, because it's really easy to break shrinky dinks. I tell my students to cut slowly and carefully to avoid problems. Cut fast at your own peril, yo.

As you can see in the picture above, I experimented with cutting out the interior of the letter (the bottom of the $). This did not work really well. You could certainly use an exacto blade and a cutting mat and get a perfect edge, but since this project was designed for middle school boys, I figured no way did I want to bring razor-sharp objects into the classroom. I colored the top of the $ black in the center, and this looked just fine, especially if you are wearing a black shirt.
When you are done, you will now use a regular old hole punch to punch a hole in your design. This is where you will use a jump ring to attach your pendant to your chain.

Don't be in such a hurry that you skip this step! Adding a hole after shrinking does not work. Shrink plastic becomes hard and rather brittle. You could try drilling it, but you'll likely ruin your piece. Punch the hole first and you don't have to worry about it. I use an ordinary-sized hole punch. Remember that the hole shrinks, too, so you don't want to use a small punch or you might find your hole closes right up.
Preheat your toaster oven to 300 degrees F. Place your pendant shiny side down on your non-stick mat (or parchment paper). Place into the oven and watch the magic happen.

Step 1: Your pendant will curl up all crazy-like and you will panic thinking that it's going to mess up completely.

Step 2: Your pendant will start to unfurl and flatten out again. You can breathe again now. When your pendant flattens out completely, count to 10 then remove the tray from the oven. Use an oven mitt, stupid!
Cautionary notes: I didn't want to tell you this earlier, in case you freaked, but sometimes, very rarely, your shrink curling into itself will stay stuck. If this happens, or seems to be happening, just pull out the tray, grab the shrinky and pull it apart. This might hurt your fingers, but will probably hurt less than having your design destroyed. This happens most often with larger sized shrinkies (1/2 of an 8x10 sheet or bigger; smaller ones usually don't have this happen.) If it looks all crazy bumpy after you do this, put it back in the oven, upside down, and shrink for a few more seconds. It will flatten out again.
Another note of caution: be careful not to overbake, especially if you are using parchment paper. If you don't pull out the shrinky soon after it flattens, it can get stuck to the parchment paper. This can be solved by running the shrinky under water until the paper softens enough to remove it. This is a pain if you have a class full of students though, so try to avoid it. I have yet to have anything stick permanently to my non-stick craft mat. It was $10 and well worth it! I can't remember the brand, but I found it at michael's near the embossing supplies.

Note the size difference between the starting design and the finished item. I'd guess that the finished shrinky is about 1/3 the size of the starting size, but I'm not exactly a math whiz, yo. With a little practice, you'll figure out the best sizes for your projects. You totally could measure your pre-shrunk and post-shrunk designs to come up with a formula that will tell you exactly how much your piece will shrink, but who has time for all that?
Now that you're shrunk, it's time to add your bling.

Working in small sections on your piece (on the front of the pendant, if you had any doubt), add a thick layer of tacky glue. Begin adding gems one by one in the design you like. For this pendant I completely covered the design in bling, but you could do only an outline or something else if you want. To place the gems, you could use tweezers or a special tool for gem-setting, but I found that for me, and for my middle school students, simply pressing your finger onto the top (sparkly side) of your gem will work. The gem will stick to your finger long enough for you to position it and press it into place.


Don't worry about having a thick layer of glue. The glue will dry clear, so you won't notice the thick parts when it's dry.

When the pendant is finished to your liking, put it away in a safe place to dry overnight. The next day, use a jump ring to attach your ball chain necklace, and BAM, you've got yourself some fresh bling, my friend.

05 December 2010
Gnome Sachet Tutorial
 |
| Gnome Sachets by Nick & Moira |
Printing on fabric is brand-new to me, but so far, so good! Instead of buying a few sheets of printable fabric at the craft store, I decided to buy a kit to make my own fabric from C.J. Jenkins Company. For $30, I got two yards of fabric, a big bottle of BubbleJet 2000, a smaller bottle of BubbleJet Rinse, and a 50-pack of freezer paper. This kit is enough to make 50 sheets of printable fabric. Buying it by the sheet at the craft store would have cost about $8 for a couple sheets.
Basically, you cut a piece of fabric slightly larger than a sheet of freezer paper. The fabric gets soaked in the BubbleJet 2000 for 5 minutes, which you can save after the fabric is finished and use for another sheet later. When the fabric is removed from the liquid, let the excess liquid drip out, but don't wring the fabric. Hang to dry. When the fabric is dry, iron to the shiny side of a sheet of freezer paper. Trim the excess fabric from the edges and you are ready to print.
I scanned in the gnome and copied it several times in PhotoShop so that I'd have 6 large gnomes and 5 smaller gnomes on a single sheet. This is enough for six large sachets (about 3 inches x 5 inches). I'll use the little gnomes for another project, but I haven't decided what it will be just yet! Print your image at the highest quality using an inkjet printer. My printer is an Epson. You should check out the CJ Jenkins site if you have a different brand to make sure the BubbleJet 2000 will work for you.
Once the image is printed, leave the fabric alone for at least 30 minutes so the ink can dry thoroughly. Wash in BubbleJet Rinse to set the ink by agitating in water mixed with rinse (about 4 caps to one gallon, I think is the recommended amount) for 5 minutes. I have a small bucket washer which I used for this purpose. I think you can use a regular washing machine, too, but I didn't have one available. Hang up the fabric to dry.
Once the fabric is dry, iron to remove any wrinkles and use as desired. For my gnome sachets, I used a layer of natural linen and a red felt to sew a pouch. I sewed the cotton and linen onto the red wool, then sewed two squares of wool together along the sides and at the top. To add the ribbon, I just cut a 6 inch piece of ribbon, folded it in half, and pinned it into the seam with the right sides of fabric together & the loop in the center of the pouch.
I filled the sachet with recycled batting and Maine Woods Balsam from Dragonfly Hill Farm. The balsam cost about $5, I think, for a 3-ounce yummy smelling bag. You could use whatever fabric scraps you have on hand to make these! You could also use lavender, dried rose petals, or whatever potpourri you have on hand to stuff them. Or don't add any scent at all & just have a cute decoration. I didn't do very neat stitches on the bottom to finish the sachet, mostly because these were my samples, but you could do a nice stitch to finish them & you have a cute present!
Subscribe to:
Posts (Atom)
