I'm so happy that the holidays over that I decided to hack up my Christmas cards:
One of my goals for 2012 is to post at least one freebie video tutorial each month!
In other news, Weekly Art Date is off to a great start. We've already had two videos and I started a cool month-long journal spread. It's not too late to sign up, since you can work at your own pace and keep all of the materials. You can learn more here.

Showing posts with label tutorial. Show all posts
Showing posts with label tutorial. Show all posts
02 January 2012
09 September 2011
Tutorial: $5 Camera Stand for Videos
I have discovered that I really love watching people's art journaling videos, and so I wanted to start making some of my own. There's just something really cool and fascinating about watching a video of a piece of art from blank canvas to a finished state. The problem that I'd been having with making videos is getting the right angle for the shot. I couldn't quite figure out how to have the focus be on the artwork without having it at a weird angle for the viewer. Plus, I didn't want to have to work on it at a weird angle, cuz that would be awkward.
Nick has a giant tripod which I'd been using for my videos, which works well, but I really wanted to be able to focus more on the artwork and less on whether or not I had too much cleavage showing. To be honest, I don't want to be in my videos at all! Well, except for my hands... those clearly need to be involved because I have not yet mastered telekinetic art making.
I knew I needed to have some sort of overhead system, but I wasn't quite sure how to make it work.... until I saw a photo of a makeshift set up on Julie Fei-Fan Balzer's blog:
I was going to rig up my own system, maybe without the bananas, but then I realized that I could very likely build a satisfactory setup using just a few things from the local hardware store. I found this tutorial which would definitely be way sturdier overall, but I didn't want to work with metal because it would be more expensive and more of a pain to try to drill, etc. It was a huge help to learn that a 1/4 inch bolt was what I'd need to screw my camera onto the stand, just I hadn't quite worked out how I was going to do that.

My journal pages are 8 x 10, which means the spread is 10 x 16, just to give you a sense of scale. If you were using a smaller journal, you could get away with a smaller camera stand, I bet. If you need a larger area, you'll need a larger stand. In order to figure out the height, I turned my camera on and held it up over the journal until I got just the right view. [I added 1 extra inch, but if I were to make this again, I'd add an extra two or three, just to enable me to zoom in on a single page if I wanted.]
To build one just like mine, you will need:
1 - 1x2x8 pine board cut into the following lengths: 2x20inches, 2x10inches, 1x24inches + remainder scrap*
1 - 1/4 inch x 1.5 inch bolt (#63332) +
1 - 1/4 inch hex nut (#63301)
2 - 1/4 inch flat washers (#63306)

For these items, my grand total came for $4.21 for this project. (And I bought two extra washers.) If you don't already have 8 screws (1.5 inches or so), you'll need to get those, too. I am assuming you already have a power drill. If not, you might want to borrow one from a friend. You could do the screws by hand, but you will need to be able to drill a 1/4 inch hole in the frame for the bolt.
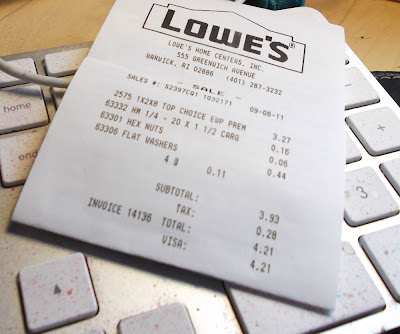
* I bought my board at Lowe's. They will cut your board for you. The signs always say that you get the first two cuts for free & additional cuts are 25 cents each, but no one has ever charged me extra, no matter how many cuts I've gotten. I do recommend going at a slower time of the day, if at all possible, so you won't have to wait in line.
+ Nick says not to buy galvanized because it's poison. Take your camera with you to test out the bolt to make sure it fits. I'm pretty sure all cameras are going to be pretty standard when it comes to tripod stands, but just in case.
The two 10 inch pieces will be the base of your stand. The two 20 inches pieces are the sides. You want to line up the base pieces so that you'll be screwing through the shorter one inch sides. Attach both bases to the sides using two screws on each then side aside.

Look on the base of your camera to see where the tripod attachment is located. Mine is about 1 inch to the left of the center. Find the center of the 24 inch board then adjust according to the tripod base. Doing this ensures that your camera, when attached, will be positioned in the center. (I.e. for my camera, I'll move the measurement 1 inch left before drilling.
Drill a 1/4 inch hole at the mark you made in the last step. You will drill the whole way through the 1-inch wide part (i.e. in the middle of the 2-inch wide part). Use the scrap piece of wood from the 1x2x8 to protect your work surface.

Screw the bolt into the hole you just drilled. Add the two washers then tighten with the nut.

Take this piece and position it between the two sides you already created. Use two screws on each side to attach this longer piece at the top of the sides. (Note that it doesn't matter which way the bolt faces at this point.)

Once your entire stand is screwed together, position it on your work surface so that the part of the bolt that you will be attaching your camera to faces away from you. Screw your camera into place and make any adjustments as needed. I found that my camera would occasionally slide down, no matter how tight I screwed it in initially, so I use a big push pin to hold it up. My camera is very light weight and this works very well for me. If your camera is heavier, you may need to putter a bit to make the stand work for you.

Here's what my camera sees from its new position on the finished camera stand. Sweet, right?

Nick has a giant tripod which I'd been using for my videos, which works well, but I really wanted to be able to focus more on the artwork and less on whether or not I had too much cleavage showing. To be honest, I don't want to be in my videos at all! Well, except for my hands... those clearly need to be involved because I have not yet mastered telekinetic art making.
I knew I needed to have some sort of overhead system, but I wasn't quite sure how to make it work.... until I saw a photo of a makeshift set up on Julie Fei-Fan Balzer's blog:
 |
| Photo copyright Julie Fei-Fan Balzer http://balzerdesigns.typepad.com/balzer_designs/2009/07/label.html |
I did a quick sketch of what I thought would work and then Nick helped me figure out the measurements for the camera height and the width of the stand so that it would fit well on my desk. You could obviously customize this to meet your own needs. First, here's a picture of my stand:

My journal pages are 8 x 10, which means the spread is 10 x 16, just to give you a sense of scale. If you were using a smaller journal, you could get away with a smaller camera stand, I bet. If you need a larger area, you'll need a larger stand. In order to figure out the height, I turned my camera on and held it up over the journal until I got just the right view. [I added 1 extra inch, but if I were to make this again, I'd add an extra two or three, just to enable me to zoom in on a single page if I wanted.]
To build one just like mine, you will need:
1 - 1x2x8 pine board cut into the following lengths: 2x20inches, 2x10inches, 1x24inches + remainder scrap*
1 - 1/4 inch x 1.5 inch bolt (#63332) +
1 - 1/4 inch hex nut (#63301)
2 - 1/4 inch flat washers (#63306)

For these items, my grand total came for $4.21 for this project. (And I bought two extra washers.) If you don't already have 8 screws (1.5 inches or so), you'll need to get those, too. I am assuming you already have a power drill. If not, you might want to borrow one from a friend. You could do the screws by hand, but you will need to be able to drill a 1/4 inch hole in the frame for the bolt.

* I bought my board at Lowe's. They will cut your board for you. The signs always say that you get the first two cuts for free & additional cuts are 25 cents each, but no one has ever charged me extra, no matter how many cuts I've gotten. I do recommend going at a slower time of the day, if at all possible, so you won't have to wait in line.
+ Nick says not to buy galvanized because it's poison. Take your camera with you to test out the bolt to make sure it fits. I'm pretty sure all cameras are going to be pretty standard when it comes to tripod stands, but just in case.
The two 10 inch pieces will be the base of your stand. The two 20 inches pieces are the sides. You want to line up the base pieces so that you'll be screwing through the shorter one inch sides. Attach both bases to the sides using two screws on each then side aside.

Look on the base of your camera to see where the tripod attachment is located. Mine is about 1 inch to the left of the center. Find the center of the 24 inch board then adjust according to the tripod base. Doing this ensures that your camera, when attached, will be positioned in the center. (I.e. for my camera, I'll move the measurement 1 inch left before drilling.
Drill a 1/4 inch hole at the mark you made in the last step. You will drill the whole way through the 1-inch wide part (i.e. in the middle of the 2-inch wide part). Use the scrap piece of wood from the 1x2x8 to protect your work surface.

Screw the bolt into the hole you just drilled. Add the two washers then tighten with the nut.

Take this piece and position it between the two sides you already created. Use two screws on each side to attach this longer piece at the top of the sides. (Note that it doesn't matter which way the bolt faces at this point.)

Once your entire stand is screwed together, position it on your work surface so that the part of the bolt that you will be attaching your camera to faces away from you. Screw your camera into place and make any adjustments as needed. I found that my camera would occasionally slide down, no matter how tight I screwed it in initially, so I use a big push pin to hold it up. My camera is very light weight and this works very well for me. If your camera is heavier, you may need to putter a bit to make the stand work for you.

Here's what my camera sees from its new position on the finished camera stand. Sweet, right?

03 September 2011
DIY Makeover: Ugly Office Chair Transformed
The chair I'm currently using at my computer is super comfortable, but, up until yesterday, was super ugly with a faded & stained yellow fabric. The fabric was very similar in texture to burlap (heck, what do I know? Maybe it was burlap?) and thus super uncomfortable to sit on when I'm less than fully dressed. [Nick jokes that I prefer to stay home because I don't have to wear pants here. So true!] I got the chair from a curb alert sometime last summer and have meant to do something about its ugliness every since, but just never got around to it.
Well... as luck would have it, I found an AMAZING zebra print fabric at the recycling center this week. It's white cotton upholstery fabric with black flocked velvet stripes. I paid $10 for a giant roll of it. I bought the fabric thinking of my teen and tween students, because this is some seriously "fresh" fabric that I know they will just love. I made this awesome little purse using only a stapler, some duct tape, a zipper and the fabric:

(Tutorial here)
The more I looked at the fabric, though, the more I thought that I wanted to do something awesome with it for myself. I decided that it was darn well time I covered my desk chair, so even though I have a million and one things to do to get ready for the Providence Arts Festival on September 10, I decided to take an hour to recover my chair.
The project was a little more complex than I'd anticipated, and I actually put the chair back together without the height adjustment lever in place. [Nick fixed it for me later.] I had the darndest time trying to remove the staples on the bottom of the seat, and after a few frustrating minutes, I decided to just staple the new fabric over the old fabric, being careful to avoid the old staples. Still, even with a few hiccups, the chair turned out GREAT!
With just a staple gun, scissors, a socket set (is that what it's called?), and my new fabric, I changed dull and dingy to fresh and fabulous.
Before:
After:


Awesome right? I used this tutorial from Curbly. I definitely recommend you give it a whirl if you want a quick update to your space for very little money. I am seriously considering doing my couch in the zebra print next. Hmm...
Well... as luck would have it, I found an AMAZING zebra print fabric at the recycling center this week. It's white cotton upholstery fabric with black flocked velvet stripes. I paid $10 for a giant roll of it. I bought the fabric thinking of my teen and tween students, because this is some seriously "fresh" fabric that I know they will just love. I made this awesome little purse using only a stapler, some duct tape, a zipper and the fabric:

(Tutorial here)
The more I looked at the fabric, though, the more I thought that I wanted to do something awesome with it for myself. I decided that it was darn well time I covered my desk chair, so even though I have a million and one things to do to get ready for the Providence Arts Festival on September 10, I decided to take an hour to recover my chair.
The project was a little more complex than I'd anticipated, and I actually put the chair back together without the height adjustment lever in place. [Nick fixed it for me later.] I had the darndest time trying to remove the staples on the bottom of the seat, and after a few frustrating minutes, I decided to just staple the new fabric over the old fabric, being careful to avoid the old staples. Still, even with a few hiccups, the chair turned out GREAT!
With just a staple gun, scissors, a socket set (is that what it's called?), and my new fabric, I changed dull and dingy to fresh and fabulous.
Before:
 |
| I wasn't using it like this, but I had already taken the top off before I thought to do a before/after shot! |


Awesome right? I used this tutorial from Curbly. I definitely recommend you give it a whirl if you want a quick update to your space for very little money. I am seriously considering doing my couch in the zebra print next. Hmm...
05 August 2011
Art Journal: DIY Copic Airbrush System ABS
Okay, so I have been coveting a Copic Airbrush system ever since I saw some awesome pages made byJulie Fei-Fan Balzer using her Copic ABS system. I didn't think I was interested in airbrushing, but all of a sudden, I wanted one hard! I even got to the point of bidding on them on eBay, even though we all know I'm not supposed to buy any more supplies until September 7th!
Of course I know that I don't need the airbrush system to make awesome art and I should be perfectly happy with all the wonderful supplies I already have... but that didn't stop me from researching the system. The Copic ABS actually hasn't gotten a lot of positive reviews on the various review sites I checked. I figure, though, that a lot of it depends on what you are expecting: it's not a regular airbrush system and it won't work the same.
The problem I had with it though it that it wasn't the type of thing you could buy once and not have to spend anymore money! You'd either need an air compressor, which I don't have and retails from $100 - $300, or you'd need to buy replacement cans of air all the time, which are $9 - $15 each. Also, you can substitute another brand of air; only the Copic ones will work with the system.
So I started researching DIY methods, and didn't find much, just this video on using canned air, which I like, but it's awkward. I wanted to have a free hand to hold my stencils or masks in place. (Also, since I can't really imagine buying air in a can, I was happy to find that my boyfriend had no such qualms!)
I thought, "Hmm, what can I use?", thinking I'd have to build some kind of rig, then noticed a stretchy headband on my desk. Eureka! I did a little experimentation, and here is the result:
(I'm having camera issues.. will update this soon with the photo!)
I am so stoked with this method. Sure it means that when I run out of spray, I'll probably, gulp, buy another can of air, but I figure I can buy 5 cans of air before it equals the cost of the original set up... and even with that I'd be buying air. Perhaps I'll save for the air compressor set up... or maybe I'll be bored with it by then. Who knows!
30 July 2011
Art Journal: DIY Spray Paints
Here's another video! This one shows ways to make your own spray paint. Enjoy!
29 July 2011
Art Journal: DIY "Washi" Tape
Admittedly, this tape doesn't have the wonderful translucent quality that makes washi tape so awesome, but it's a great way to get the cool look of the tape without the big bucks! This video was made for Mission Nine of the 30 Day Craft Cleanse. If you aren't already a member of this FREE art journal class, you should check it out!
23 June 2011
Art Journal: Mini Washi Tape Spools

I'm teaching art classes around the state of Rhode Island this summer, and the classes I am most excited about are the art journal ones. I have been in love with art journals since I first discovered them, and sharing the joy with my students is a real blast. Each student quickly develops his or her own style, and it's so fun to see all the different ways that they tackle the concept.
One of my new favorite things for art journaling is washi tape. I resisted the lure of the pretty Japanese paper tape for months and months, but after a great day at the Providence Arts Festival earlier this month, I decided to treat myself. Since I've been having so much fun with washi tape, I definitely wanted to introduce it to my students this summer. Since I can't afford to buy a roll of washi tape for 176 students (!!!), I needed to find a way to make smaller rolls. In the past, I have wrapped masking tape around cardstock for the kids to take home, but this idea is way better!

I found an etsy seller who sells "Washi Tape by the Foot." You get up to three feet of your choice of their many available washi tapes and it comes wrapped on a wooden spool. If you are interested in trying out washi tape, this is a great way to get a selection without spending a fortune! For me, however, I already know that I love it and need so many spools, that I knew I could do it myself for very little expense.
I found wooden spools in packages of 20 at Michaels for $2.99 each. [If you wanted to get crazy, I found a site online where you can buy them in packs of 100 for $9.99 + $10 shipping. Can't find the link right now, but will update if I track it down.] I measured out 12 inches of tape and carefully wrapped in around the spool. It's actually harder than it looks to do this straight! Still, I was able to get 140 wrapped while watching television yesterday afternoon.
In addition, I wrapped another 20 spools with more tape (maybe 5 feet?) that I will have on the tables for the students to use during the class. Using these instead of the full rolls means that: a) the full rolls won't get destroyed in one class, b) I can have multiples of each color so students get a variety at each table, and c) students will know what the spools are in their kits! Each student will get a take home kit with a marker, a pen, a glue stick, some scrap paper, and one spool of washi tape all of their own. Fun, right?
20 June 2011
Tutorial: DIY Mini Polaroid Prints

When I watched the video for today's prompt this morning for Natalie Malik's free online art journaling class, In The Sun, I knew instantly what I wanted to do: polaroid pictures! I know that I have an actual old school polaroid camera under my desk, but I wanted to use my Polaroid POGO printer to make mini polaroids. So tiny! So cute! I haven't done my page for today yet, but I'm so excited by my mini-project that I wanted to share right away.
To make your own DIY polaroid prints without a polaroid camera, you will need:
- photo prints of images you like [Note: If you don't have a POGO like I do, you could get one-hour prints at your local photo shop very cheap. Or you could just use images from a magazine cut to size... why not?]
- 3x5 blank white index cards, or any white card stock {You could just plain white printer paper, sure, but using card stock gives the mini polaroids a bit of heft like a real polaroid would have.}
- glue (if you aren't using a POGO)
- ruler
- scissors or exacto knife

Choose the prints you want to use for your mini polaroids. Remember that you will be cropping the image into a square shape, so try to choose images based on what will look good in a square shape.

If you are using a POGO print, you just have to crop one-inch from the longest side of the print. You can see that for some images, I just cut an inch off the side; for others, I trimmed a little from each side. I have a metal ruler that is two inches wide, so I used that as a cutting guide. You could also draw guidelines with a pencil.
If you are using a larger size print, you can make a square by cropping the long size to the same length as the shortest side. (I know, duh, right?) Or you could make a square viewfinder in a plain piece of card stock (just cut with an exacto knife) and use that to find the best part of your image to crop. This would work well for finding an image in a magazine, too.

For the POGO, you'll affix your square using the sticker back. For another print or magazine, use a glue stick or your choose of adhesive. After making this first two prints, I realized I'd have less cutting if I placed the image in the corner instead of towards the middle. I was able to make two mini prints from each index card. Trim to size. I just eyeballed this. Basically, the bottom is about a third the height of the image, give or take. Then you'll have a thinner border at the sides and top. If you wanted this really precise, I'm sure you could find the exact dimensions online, but I didn't care if it was exactly right.

Enjoy your cute DIY polaroid prints! You'll be seeing mine soon in an art journal spread. I'll link it here whenever it's done. Have fun!
15 June 2011
DIY Decorating: Free Window Treatment Tutorial
Okay, so calling this window treatment idea "free" isn't exactly true: if you don't have the few required items already at home, you'll have to buy a couple things. Even if you have to buy everything you'll need, you can do this project for under $10, probably even under $5! And, since clean up and removal is a cinch, this is a perfect project for renters!
How awesome is this:

I have an enormous gorgeous window in the bathroom of my new apartment. There is a beautiful tree right outside the window, but in addition to the tree, there's a view of the street. Since I don't like people peeping in on me while I'm in the bathroom, I need something covering the window. But I hated to block out the view of the tree in the top half of the window. The apartment came with blinds, which would be a-okay except that my cat, Smudge, has a strange penchant for crawling through the blinds to peer at birds out the window. I've been meaning to do something about this for the two weeks we've been living here, but when I walked into the bathroom to see the blinds looking crazy askew, I knew today was the day. I really don't want to have to replace the blinds before we move out because I was lazy, ya know?
Originally, I figured I'd make a curtain, but then realized the cat would promptly destroy it. So I thought about contact paper or window film. Contact paper isn't exactly designed for windows, but I know it would work... but did I want to deal with cleaning up the adhesive later when I had to remove it? Nah. Window film is specifically designed for windows, but the size of the glass panels in the window are just a little too big for me to get away with using one roll of film. Did I want to spend $40 on window film? Nah.
Then I remembered having once read a blog about using spray starch to add fabric to walls in apartments when you couldn't paint. I figured that if it worked on a wall; it would probably work on a window so I did a little searching and found this entry from all buttoned up. She used cotton fabric soaked in spray starch to cover her window. What really sold me on the idea was that she'd edited the blog a year and a half later to report that the window treatment was still holding firm.
So, then, I thought "Where the heck does one buy spray starch?" since the last thing I ironed was paper that I'd glued together with gel medium. Just as I was about to head to the store, I thought, "Wait a minute? What's in spray starch anyway?" Turns out it's wicked easy to make your own spray starch. You need, literally, corn starch and water. How awesome would it be if I could make a successful window treatment without even leaving my house or spending a penny? Uh, totally awesome!
I remembered that I'd gotten a bunch of polyester lace for free back when I bought my massive stash of zippers, so I went into the kitchen, where I am temporarily-forever storing my sewing supplies on top of the kitchen cabinets. Luckily, the first box I grabbed was the one with the lace. But I had a problem: I had pink, purple, red, blue, and black lace... but none of those was going to work for my bathroom. I kept digging and then I found it: a large piece of kinda ugly white lace. Perfect!
If you'd like to make your own (almost) free window treatments, you will need:
a ruler
scissors
enough fabric to cover your window glass*
large-ish paintbrush, optional, but nice
corn starch
water
large saucepan
rubbing alcohol or spray glass cleaner
* I suspect that natural fibers like cotton would be best because it will soak up the liquid... but so far so good on the cheapo polyester lace! If you aren't sure, just try it. You can also wash out the starch if it doesn't work and use the fabric for something else. The starch will make your fabric less transparent, so if you want to let in light, get the thinnest, most translucent fabric you can find.
Clean the windows. I used rubbing alcohol all across the glass, but this probably isn't strictly necessary. Just make sure they aren't gross, a'ight?
Place two cups of water to boil. In a separate saucepan, whisk 1/4 cup of cornstarch with 1/2 cup of cold water. Whisk in the boiling water and bring to a gentle boil until the mixture just starts to thicken. Remove from heat.
Meanwhile, measure the glass in your windows and cut your fabric to fit. You'll see in the picture that mine ended up just a touch too big. I'm going to trim that later, once it's completely dry, and hope everything stays put. It's easier to make the fabric smaller later than to try to add more to it. Err on the side of big.
Place a towel on the window ledge to catch drips.
Pull out the panel, let it drip a bit, but don't wring it out. Apply to the window by starting at the top, smoothing it into place, and working your way to the bottom. Use the paintbrush to paint a layer of starch on top of the fabric panels.
Allow to dry. Leave the towel in place for a long time, because it will continue to drip. I wiped away the starch drips a couple times during the day with some tissues. This cleans up very easily, so don't panic. I was able to clean the windows very easily from the first recipe I tried and don't anticipate any issues with this one either.
Revel in your crafty bad self. Enjoy your new window look!
How awesome is this:
I have an enormous gorgeous window in the bathroom of my new apartment. There is a beautiful tree right outside the window, but in addition to the tree, there's a view of the street. Since I don't like people peeping in on me while I'm in the bathroom, I need something covering the window. But I hated to block out the view of the tree in the top half of the window. The apartment came with blinds, which would be a-okay except that my cat, Smudge, has a strange penchant for crawling through the blinds to peer at birds out the window. I've been meaning to do something about this for the two weeks we've been living here, but when I walked into the bathroom to see the blinds looking crazy askew, I knew today was the day. I really don't want to have to replace the blinds before we move out because I was lazy, ya know?
Originally, I figured I'd make a curtain, but then realized the cat would promptly destroy it. So I thought about contact paper or window film. Contact paper isn't exactly designed for windows, but I know it would work... but did I want to deal with cleaning up the adhesive later when I had to remove it? Nah. Window film is specifically designed for windows, but the size of the glass panels in the window are just a little too big for me to get away with using one roll of film. Did I want to spend $40 on window film? Nah.
Then I remembered having once read a blog about using spray starch to add fabric to walls in apartments when you couldn't paint. I figured that if it worked on a wall; it would probably work on a window so I did a little searching and found this entry from all buttoned up. She used cotton fabric soaked in spray starch to cover her window. What really sold me on the idea was that she'd edited the blog a year and a half later to report that the window treatment was still holding firm.
So, then, I thought "Where the heck does one buy spray starch?" since the last thing I ironed was paper that I'd glued together with gel medium. Just as I was about to head to the store, I thought, "Wait a minute? What's in spray starch anyway?" Turns out it's wicked easy to make your own spray starch. You need, literally, corn starch and water. How awesome would it be if I could make a successful window treatment without even leaving my house or spending a penny? Uh, totally awesome!
I remembered that I'd gotten a bunch of polyester lace for free back when I bought my massive stash of zippers, so I went into the kitchen, where I am temporarily-forever storing my sewing supplies on top of the kitchen cabinets. Luckily, the first box I grabbed was the one with the lace. But I had a problem: I had pink, purple, red, blue, and black lace... but none of those was going to work for my bathroom. I kept digging and then I found it: a large piece of kinda ugly white lace. Perfect!
The first recipe I tried, one for DIY Spray Starch, was an epic FAIL when it came to the windows. {It might work wonderfully for ironing, which is why I still included the link!} Yes, it looked gorgeous; yes, I was able to snap the above photo, but five minutes later, the whole thing fell to a soggy mess on the floor. I reapplied it only to have the same thing happen immediately after. By this time, I was frustrated and also thoroughly committed to making the idea work. I sent Nick to the drug store for a can of spray starch.
While he was gone, I started searching again and came across a post from How About Orange included a recipe very similar to the one I'd used except that it was cooked and thickened. That made so much sense to me! I needed the heat to activate the starch, which is probably why the first recipe would be great for ironing; not so great for plastering shit to your windows. I made a colorless, flavorful gravy using this recipe, very slightly adapted from the original. It worked! It's gorgeous! It's still up after being up overnight. My boyfriend is so impressed with my crafty ingenuity right now. We'll be returning the can of spray starch to the store.
If you'd like to make your own (almost) free window treatments, you will need:
a ruler
scissors
enough fabric to cover your window glass*
large-ish paintbrush, optional, but nice
corn starch
water
large saucepan
rubbing alcohol or spray glass cleaner
* I suspect that natural fibers like cotton would be best because it will soak up the liquid... but so far so good on the cheapo polyester lace! If you aren't sure, just try it. You can also wash out the starch if it doesn't work and use the fabric for something else. The starch will make your fabric less transparent, so if you want to let in light, get the thinnest, most translucent fabric you can find.
Clean the windows. I used rubbing alcohol all across the glass, but this probably isn't strictly necessary. Just make sure they aren't gross, a'ight?
Place two cups of water to boil. In a separate saucepan, whisk 1/4 cup of cornstarch with 1/2 cup of cold water. Whisk in the boiling water and bring to a gentle boil until the mixture just starts to thicken. Remove from heat.
Meanwhile, measure the glass in your windows and cut your fabric to fit. You'll see in the picture that mine ended up just a touch too big. I'm going to trim that later, once it's completely dry, and hope everything stays put. It's easier to make the fabric smaller later than to try to add more to it. Err on the side of big.
Add fabric to the saucepan, making sure to coat, and allow to soak / cool until workable. I waited about 15 minutes, but I was really impatient and it was still pretty hot when I started. You might want to do one fabric piece at a time. The recipe I did was enough for two 14 x 36 inch panels, with a little starch to spare. If you have more fabric than this, you could always add up to 2 cups extra water when you are initially cooking the starch mixture.
Place a towel on the window ledge to catch drips.
Pull out the panel, let it drip a bit, but don't wring it out. Apply to the window by starting at the top, smoothing it into place, and working your way to the bottom. Use the paintbrush to paint a layer of starch on top of the fabric panels.
Allow to dry. Leave the towel in place for a long time, because it will continue to drip. I wiped away the starch drips a couple times during the day with some tissues. This cleans up very easily, so don't panic. I was able to clean the windows very easily from the first recipe I tried and don't anticipate any issues with this one either.
Revel in your crafty bad self. Enjoy your new window look!
23 April 2011
Craft Serendipity: Freezer Paper Journal Covers
First of all: have you entered my giveaway yet? You could win a $25 gift certificate to Literary Tease!
Today I'm going to give you the basics on how to make this:
But, first, a story: I recently made a lot of sheets of stitch paper as described in Kelli Nina Perkins awesome book, Stitch Alchemy. The fabric / paper fusion material uses large sheets of freezer paper as a base. Instead of throwing away the freezer paper away after I peeled the stitch paper from it, I've been using it as a base for messy art projects. I put the shiny side down on my work table and work on the non-shiny side.
As I was working on my studio tasks for today, I needed to clear my craft table for another project. I looked at the sheet of freezer paper and decided it was much too pretty to throw away. It's covered in bright spray paint splatters, messy paint drips and splatters, and shiny streaks of gel medium, and it's beautiful. I put it off the the side and once my table was cleared, I started on my first project of the day: making a canvas-bound art journal for myself.
Nancy Rafi, of Rafi Designs, makes gorgeous hard-bound journals and I've been wanting one of my own for months. Hers are beautiful, but I wanted a nice blank journal that I could decorate myself. Plus, I like working in 8 x 10 size, and hers are 8 x 8. When I asked Nancy about her source for the book cloth tape, the only thing I didn't have on hand in my studio, she was kind enough to send me a sample. You'll be seeing more of my journal soon, I'm sure, but here's the blank journal I made:

After making the journal, I had leftover strips of Fabriano Artistico paper which were just the right size to make mini journals, 5 x 6.25 inches. I didn't have canvas in the right size and didn't feel like cutting any boards down to size, so I needed something else to make the cover. I turned around, looking for inspiration, and I saw the freezer paper. Perfect!
I tore pieces of freezer paper to fit the cover and headed to my sewing machine to sew the paper onto the first folded page in the journal. Just before I started, I realized that I'd probably want to cover the stitches on the back of the cover and that using the Artistic paper was probably a waste for the cover. (I love Fabriano Artistico hot press 140 lb watercolor paper, but it's expensive, for paper: $4 a sheet.) Instead, I came back to my studio and grabbed a few 8.5 x 11 sheets of cardstock from my printer. This actually turned out to be a great idea!
I used a zigzag stitch to sew the freezer paper right in the center of the page. I considered trying to line up the edges, but it's actually better to have some room around the edges. You can't pin the paper into place, so it might move on you when you first start. I sewed around all the edges, overlapping a little bit at the end. Be careful to stay on the freezer paper when you are stitching. You'll be trimming this later and won't want to accidentally cut the stitches.
For the first journal, I then trimmed the cardstock to fit the freezer paper, which I already measured to fit the journal. I folded this in half and will be binding the journal with a simple pamphlet stitch. For the next two journals, I decided that it would be better to coat the whole thing front and back with gel medium (allowing one side to dry before doing the other). Then, I cute a piece of rice paper to cover the stitching and glued it in place with gel medium. I let this dry overnight. Then, I'll trim the cover, fold, and bind. This will give the stitches more strength and make the cover better lasting.
You could definitely bind the three signatures together for a chunky, awesome journal, but I think I'm going to leave them as three separate mini journals. Each one has three small pages of watercolor paper folded in half. They will make a great travel journal to toss in my bag before a trip (like New York next month!). If you don't already know how to do a pamphlet stitch, I found this tutorial at Sarah Nielsen's blog.
[Note: I always sew my pamphlets so that the tied ends are on the outside. This way when I'm done working in the journal, I can add beads or other adornments! I don't recommend adding adornments until after you're finished working inside the journal because the beads tend to fall off and/or get in the way.]
Today I'm going to give you the basics on how to make this:
 |
| Freezer Paper Journal Cover |
As I was working on my studio tasks for today, I needed to clear my craft table for another project. I looked at the sheet of freezer paper and decided it was much too pretty to throw away. It's covered in bright spray paint splatters, messy paint drips and splatters, and shiny streaks of gel medium, and it's beautiful. I put it off the the side and once my table was cleared, I started on my first project of the day: making a canvas-bound art journal for myself.
Nancy Rafi, of Rafi Designs, makes gorgeous hard-bound journals and I've been wanting one of my own for months. Hers are beautiful, but I wanted a nice blank journal that I could decorate myself. Plus, I like working in 8 x 10 size, and hers are 8 x 8. When I asked Nancy about her source for the book cloth tape, the only thing I didn't have on hand in my studio, she was kind enough to send me a sample. You'll be seeing more of my journal soon, I'm sure, but here's the blank journal I made:
After making the journal, I had leftover strips of Fabriano Artistico paper which were just the right size to make mini journals, 5 x 6.25 inches. I didn't have canvas in the right size and didn't feel like cutting any boards down to size, so I needed something else to make the cover. I turned around, looking for inspiration, and I saw the freezer paper. Perfect!
I tore pieces of freezer paper to fit the cover and headed to my sewing machine to sew the paper onto the first folded page in the journal. Just before I started, I realized that I'd probably want to cover the stitches on the back of the cover and that using the Artistic paper was probably a waste for the cover. (I love Fabriano Artistico hot press 140 lb watercolor paper, but it's expensive, for paper: $4 a sheet.) Instead, I came back to my studio and grabbed a few 8.5 x 11 sheets of cardstock from my printer. This actually turned out to be a great idea!
I used a zigzag stitch to sew the freezer paper right in the center of the page. I considered trying to line up the edges, but it's actually better to have some room around the edges. You can't pin the paper into place, so it might move on you when you first start. I sewed around all the edges, overlapping a little bit at the end. Be careful to stay on the freezer paper when you are stitching. You'll be trimming this later and won't want to accidentally cut the stitches.
 |
| Accidentally beautiful scrap! |
 |
| This is pre-rice paper but shows how the journal will work. |
[Note: I always sew my pamphlets so that the tied ends are on the outside. This way when I'm done working in the journal, I can add beads or other adornments! I don't recommend adding adornments until after you're finished working inside the journal because the beads tend to fall off and/or get in the way.]
Subscribe to:
Posts (Atom)
