06 July 2011

Giveaway: Book Binding Tutorial (PDF)

Future travel art journal!
Okay, I'll admit it: this is a giveaway with a catch.

I am working on a PDF tutorial for making the journal above. I developed the technique after not being able to find a tutorial available to make what I wanted to make: a hardback journal with a fluffy spine. I don't really know why I wanted to make such a journal, but I did, so I figured out how to do it. I took a bunch of picture of the one I was making last night, intending to make a tutorial for on the blog. I realized, looking at the picture this morning, that they would be perfect to turn into a PDF for me to sell, both on the blog and in my etsy shop. It's really too long for a blog entry anyway.

Future art journal... so pretty, right?
I have bought PDF tutorials from other artists, and I see people selling them online all the time, but I have never taken the time to write one, though there are plenty of projects I could do! [My next venture will be to make a tutorial for the tri-fold wallet I designed around Christmas time - I'm so proud of it!] After working on this one for several hours today and barely making a dent, I can totally see why I haven't made one before! Whew! It's a great thing, though, if it's done well, because you do the work once and theoretically sell it over and over again. I found comparable (but different!) tutorials selling on etsy for $15 - $25. I was thinking $5 - $10, when I started this project, but I might change my mind depending on how much longer it takes to finish it up.

I am doing a really in-depth tutorial. I have 38 high-res photographs and have already identified a couple of places where I need a few more photos to clarify my point. While this makes it sound like the journal is really complicated, it's not, once you get the hang of it. Plus, I have thought of a couple ways to adapt it so that it's like getting a few tutorials in one.

Here's where you come in: I need a tester (or a few) to try out the tutorial once I've gotten it finished. So by entering this giveaway, you are hopefully entering because you'd like to give the tutorial a whirl -and- would be willing to give me feedback on your experiences with it. I teach people how to make things in person all the time, but doing a PDF is a whole different ball game. I need to know what's confusing and what's overstating the obvious. I need to know what questions people might have that should have been answered in the tutorial and I need to know that the way I explain the steps makes sense to people other than me.

In exchange for this service,  you'll get a copy of the tutorial free of charge and, hopefully, a beautiful book made by you at the end of it. [I will be available to help you with anything that's confusing, naturally!] Plus, if you are selected and you get back to me with feedback within a timely manner (One week? Maybe two?), I'll send you any pocket mirror, bottle opener, or button you'd like from my shop or make you a custom one with your own image. Not bad, right?

To enter the giveaway, just leave me a comment telling me why you'd like to learn how to make this book. That's it. Being a follower is not required. If you have friends who might be interested, feel free to tell them! If you really, really want to win, tell me that in the comments, because I might choose a few extra people! I will choose a winner this weekend, or when the tutorial is finished, whichever comes later.

05 July 2011

Art Journal: In The Sun Round Up


We're a month in over at Natty Malik's In The Sun art journal course, so I figured I'd share all of the pages I've created for this course to date. I am impressed with myself for keeping up as well as I have! You should definitely check out the In The Sun flickr group to see what all of my classmates have been creating as well. We've got an amazing bunch of artists working together this summer, and I am thrilled to be a part of the fun.

Clicking each image will bring up flickr, where I describe my process and tell you more about the images. I put the images after a break because it's a very image-heavy post.


04 July 2011

Art Journal: Beach Playlist

Beach Playlist


This page was a fun one! I started by gluing half a sheet of old music to the left side of the page. Dry-brushed on some neon green craft paint when it was dry, then used watered-down black craft paint to add lots of drips and splatters.

The image came from a glossy magazine that has long since lost its cover -- no idea which one! (Wish I did! I'd subscribe!) I used a white Sharpie poster paint pen to add text at bottom and a Uni-Ball Signo Gel pen to add white text on the girl. Text is bits and pieces from all of the songs. I used Copics to add color to her face, accented with a black Sharpie pen.

For the list, I tried writing over the background, but none of the colors showed up very well, so I covered it with a graph paper list instead. Luckily, I had the perfect colors in washi tape! (Love the lace one!)

List is:

redemption song - bob marley & the wailers
blue skies - tori amos
summertime - morcheeba
dancing queen - ABBA
summertime - janis joplin
good day sunshine - the beatles
love street - the beatles


Get a playlist! Standalone player Get Ringtones

Teen Summer Classes: Shrinky Dink Self-Portraits

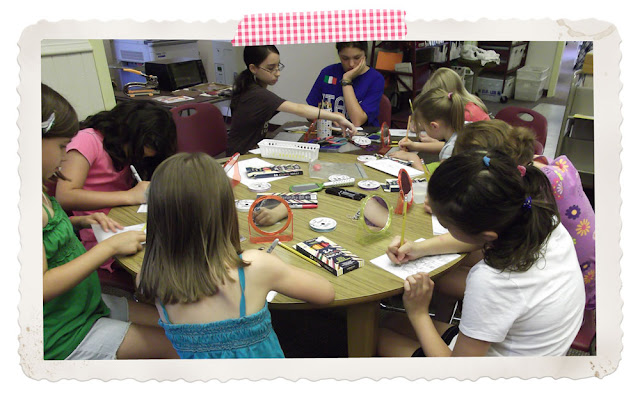
 This week I taught my first summer Shrinky Dink Self-Portraits class. For the class, students draw self-portraits, which they transfer onto shrink plastic, color, and then bake in the toaster oven I bring to the classes with me.
For the class, I place stand up mirrors at each seat around the table. Students fold a sheet of printer paper in half and draw their self-portrait within the space.

After asking the students to tell me what a self-portrait is, I explain that a self-portrait is more than just a picture: we want our self-portraits to tell a story about who we are to someone who doesn't know us. So if you like cats, you might want to draw a picture of a cat. Or make your drawing of you be wearing a t-shirt in your favorite color.


I always have at least one student tell me that they can't draw, and I tell them that this project is a good way to practice their drawing skills. I tell them that drawing takes a lot of practice and that even people who can draw well didn't start out that way.


I also always tell the students that their drawing don't have to be perfect, because perfect is boring. I love it when I say this, because there is always at least one student who repeats the phrase to herself, like she is trying the idea on for size. I like to imagine that at least a few of my students here and there take that phrase home later and own it.


After the students have drawn a portrait they like, they trace it on to the shrink plastic (rough side) in pencil, and then trace over the pencil lines in marker.


The last step is to add color using colored pencils. Then they bring the design to me, where I punch a hole and bake it until it shrinks. This process amazes anyone who has never seen shrinky dinks in action!

I add a jump ring and ribbon to complete the necklace, and every student left wearing their creation.

I also make take home kits for the students which includes two small pre-punched pieces of shrink plastic, several long ribbons, and at-home instructions. So much fun!

03 July 2011

Art Journal: Roadtrip

Road Trips

One of the recent prompts in Natty Malik's In The Sun art journaling class was to create your ultimate road trip playlist. I like all kinds of music, but love singing along the most, so I chose songs that are fun to sing with... You can listen for yourself:


Get a playlist! Standalone player Get Ringtones

02 July 2011

Buy Nothing Summer: Conquer the Want


Let me tell you: my bank account balance is LOVING this Buy Nothing Summer challenge that I have issued for myself! Since most of my purchases are generally art or craft supplies, I've hardly touched my ATM card since the challenge started. I even paid off half of my credit card balance, since I wanted to make sure I wasn't going to be tempted to go on a craft binge.

That being said, it's not all easy. The hardest part of buying nothing, I think, is conquering the want. Every day I get all these emails about new products being used in new ways. Sharpie just released a line of fabric markers called Stained. Julie Balzer did a blog feature about sun printing with fabric paints. Somebody else used fabulous images from Frankie magazine in their art journal. I want it all!

But, no! I am determined to bust my stash, and the only way I'm going to make a dent is if I don't keep bringing home new supplies. So I deleted the email from Sharpie, bookmarked the sun printing blog entry for future reference, and ordered a free catalog from Peruvian Connection, which might not have images quite as cute as Frankie's, but still great. (In compliance with the Buy Nothing Summer rules, I added another magazine from my stash to the recycling bin.)

If you are battling your own greedy craft demons, you might want to check out artist Leslie Herger's series of blog posts called "The Cult of Stuff." Here's an excerpt:
It’s so easy to pick up a rubber stamp that fit my needs. So much easier than carving a wine cork or an eraser. Or what about some of that premade ephemera? It’s ACID FREE and ARCHIVAL! Why cut my own stencil when I can buy one? Look at all the rolls of shiny tape! I could make my own with plain white or colored but it’s so much easier to just buy a roll.

This is how we end up with totes and drawers full of stuff we don’t really use, stuff we bought on a whim like those really cool looking sandals that ended up being fabulous to look at but were hell on the toes.
Visit Comfortable Shoes Studio to read the whole series (plus a bunch of great art journal ideas, videos, pages, and inspiration!) Also, my interview with Leslie is here.
See all of the Buy Nothing Summer posts here.
For those of you playing along, how are you avoiding shopping overload this summer?

01 July 2011

Summer of Color: Thinkin' Pink

Strange Beauty

I never plan anything out when I make an art journal page. I might have a vague idea of what I think I might do, but, generally, I just like my artistic sense take over and see where it leads me. For this spread, I started by making a background using homemade watercolor spray paints. I used a paper doily as a mask, which left me with a cool background texture and a pretty doily... bonus! Next, I made a gel medium transfer of a woman's head (from a glossy mag, but can't remember which one).  

When I looked at the page, I imagined a mermaid in the space. This is something new for me: seeing something that's not there and then creating it there. It's such a cool sensation! Like being able to see the future, just for an instant. After I drew and outline the mermaid, I thought for sure I had ruined everything. The proportions are off, particularly on the neck, which usually bugs the heck out of me, but I decided to push through it and keep going. Artist Teesha Moore said in one of her video that she feels you should push past the point of feeling like a page is done twice: one to get over any mental blocks, the second to let magic happen. (Okay, she didn't word it quite like that, but you get the gist.) I thought about that idea as I worked on this mermaid. 

I used Stewart Gill Alchemy paints for the tail and mermaid body, plus some SG glitter flakes. I outlined everything using my trusty Sharpie poster-paint marker. I added shadows at the bottom with black pan pastel, then highlights above with yellow. 


I thought the mermaid was looking pretty strange and kind of beautiful at this point, and I tried to find a "strange beauty" quote without success. Instead, I did my own thing: "There is beauty in all things strange." For the text, I used a regular pink Sharpie, outlined it with the poster-paint marker, added shadow with a ShinHan Touch Twin marker (Cool Gray#5), then added highlights with a white gel pen (uniball signo).

I added doodles at the top, washi tape + doodles at the bottom, and then, because I remembered that this week's bonus challenge for the Summer of Color is to use wax so I added lots of color to her hair using NeoColor II crayons. Even though I didn't like this page at first, now I like it a lot. What do you think?
Related Posts Plugin for WordPress, Blogger...